Appearance
Subgraphs
Use a Subgraph to put a group of nodes inside one container. The parent graph shows only the container and the connections that cross its boundary; you can enter it to edit the original nodes.
What is a Subgraph?
A subgraph is a container node that holds its own internal graph. From the outside, it looks like a single node with input and output ports. Inside, it contains a full node graph.
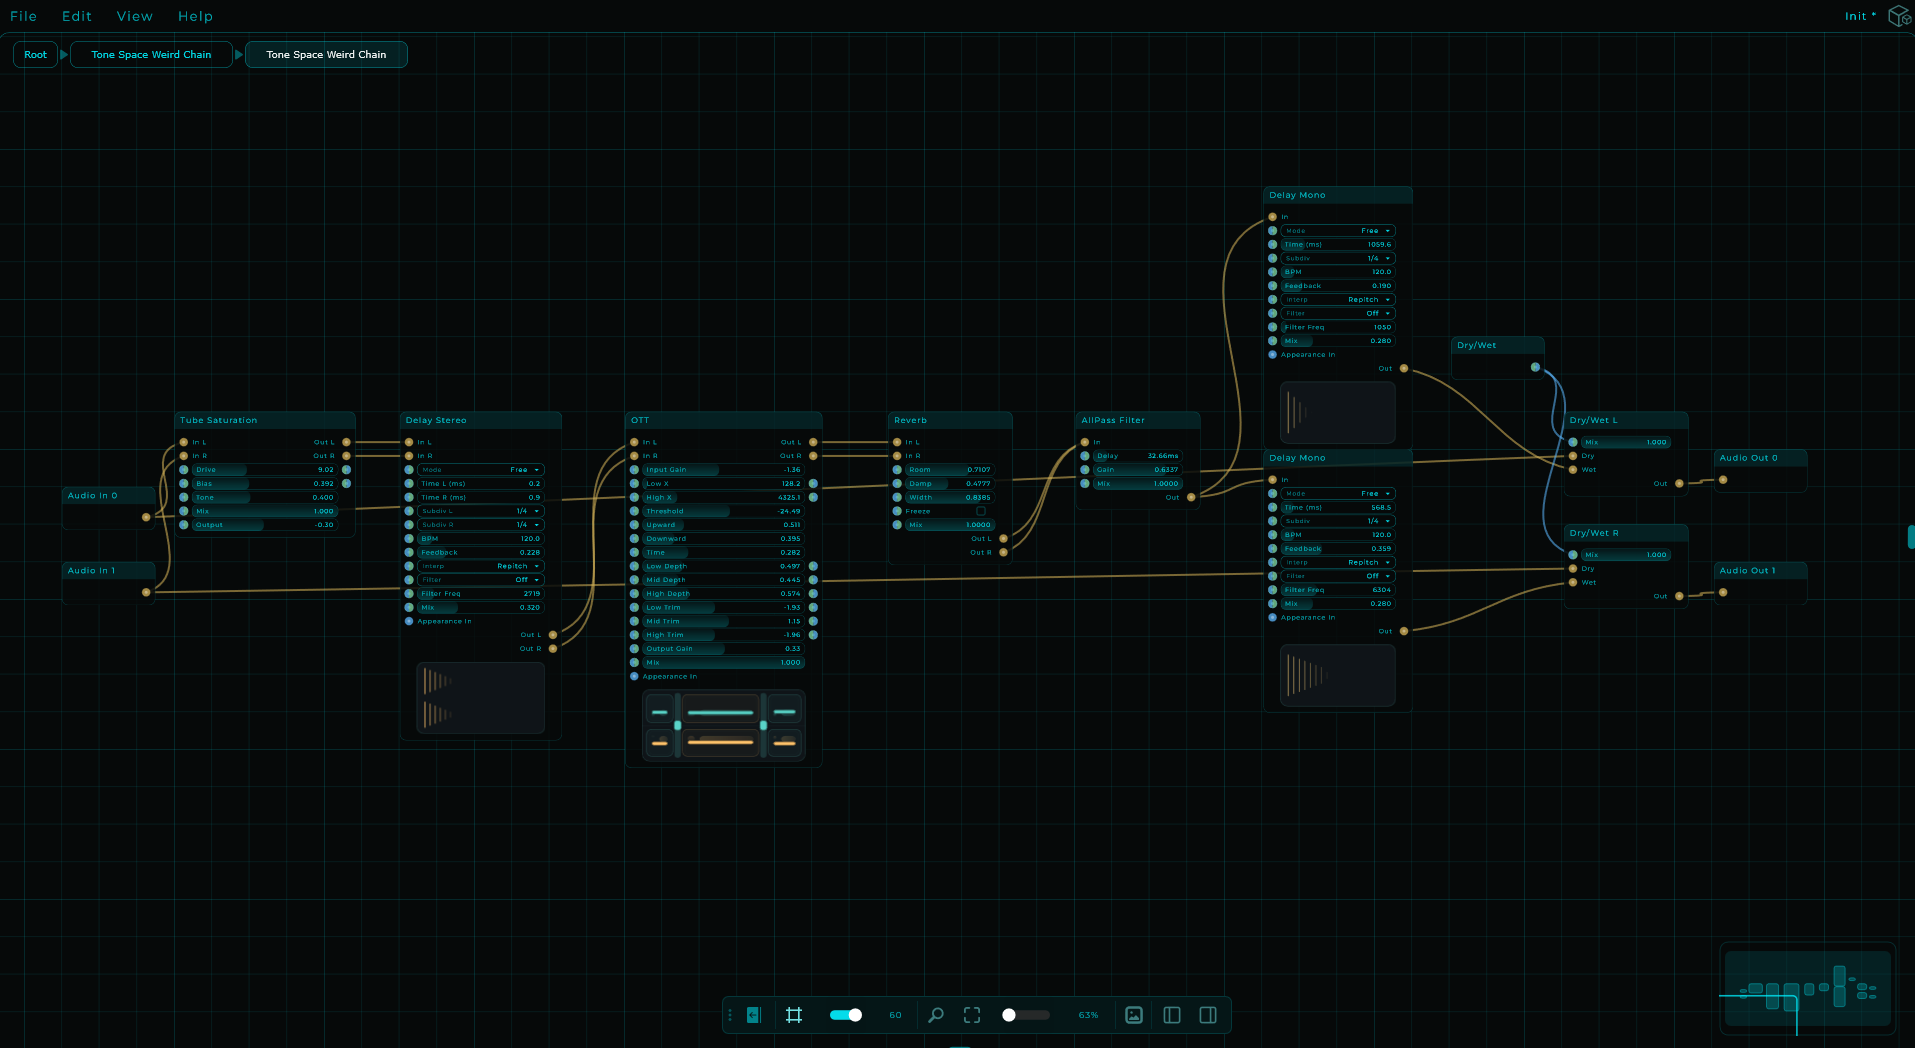
Notice the breadcrumb navigation at the top left showing the path: Root → subgraph name. Click any level to navigate back up.
Creating a Subgraph
Try it with a working patch
In Your first patch, the audio path is Saw → Filter → Volume → Audio Out. Select Filter and Volume, leaving Saw and Audio Out outside, then press Ctrl/Cmd + G.
The two selected nodes become one Subgraph. Its input still receives Saw, and its output still feeds Audio Out. Any control cable crossing the selection boundary gets a corresponding port too. Open the Subgraph and you will find Filter and Volume with their original names.
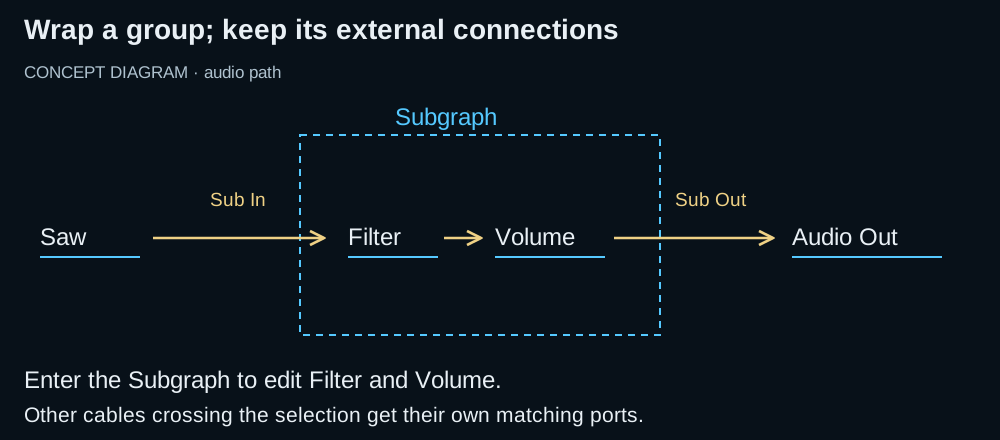
Concept diagram: wrapping changes where you edit the nodes, while the connections crossing the group remain available on the container.
Wrap a selection
- Select the nodes you want to encapsulate
- Press Ctrl/Cmd + G to wrap the selection in a Subgraph
- The selected nodes are moved inside a new subgraph node
- Input/output ports are automatically created based on existing connections
Or create an empty subgraph and build from scratch:
- Add a Subgraph node from the Node Palette
- Double-click to enter the subgraph
- Build your internal graph
Subgraph I/O Ports
Use these special nodes inside a subgraph to define its external pins:
| Node | Purpose |
|---|---|
| Sub In (Audio) / Sub Out (Audio) | Audio enters / leaves the container |
| Sub In (MIDI) / Sub Out (MIDI) | MIDI enters / leaves the container |
| Sub In (CV) / Sub Out (CV) | Continuous CV; stays in CV mode even without an external stream |
| Sub In (Data/CV) / Sub Out (Data/CV) | Hybrid ports for Data values/events or a CV stream |
Each port node you add inside the subgraph creates a corresponding pin on the outside. The pin colour and label match the port type so it's clear what kind of signal each one expects.
CV vs Data ports
Both CV and Data ports carry non-audio signals, but they behave differently:
- CV carries a continuous modulation stream, such as an LFO or envelope, which a compatible destination reads per sample.
- Data carries values and events, such as a Knob output, a button event or text.
Choose the port to match the signal and the destination. Use the CV-only versions when the internal patch needs a CV stream even before you connect the outside. Use Data/CV when the port should accept either values or a continuous stream. See hybrid pins for how that choice affects the connection.
Automatic port creation
When you wrap existing nodes with Ctrl/Cmd + G, MNodes looks at the connections that cross the selection boundary and creates matching port nodes inside for you:
- A cable coming in to the selection becomes a Sub In of the matching type.
- A cable going out becomes a Sub Out.
- The port's name comes from the pin it connects to (you can rename it later).
This means your patch keeps working: nothing gets disconnected when you group.
Editing a Subgraph
- Double-click the subgraph node to enter it, or select it and press Enter.
- Breadcrumb navigation shows your current depth.
- Click the parent breadcrumb, or press Esc, to go back up one level.
Nesting
Subgraphs can contain other subgraphs, as many levels deep as you want. The breadcrumb grows with each level so you always know where you are. There's no hard limit, but very deep nesting can make a patch hard to navigate, so use it where it adds clarity, not just for the sake of it.
No feedback loops between levels
A subgraph cannot route audio from an outer level, back through itself, and into its own input: that would create a feedback loop. MNodes prevents this when you try to wire it. If you need feedback, keep it inside a single graph level.
How a Subgraph Looks from Outside
From the outside, a subgraph looks like a single node with the input and output pins you defined inside it. In the screenshot below you can see a subgraph called "Tone Space Weird Chain" with its Audio In, multiple audio outputs, and a Dry/Wet knob on top.
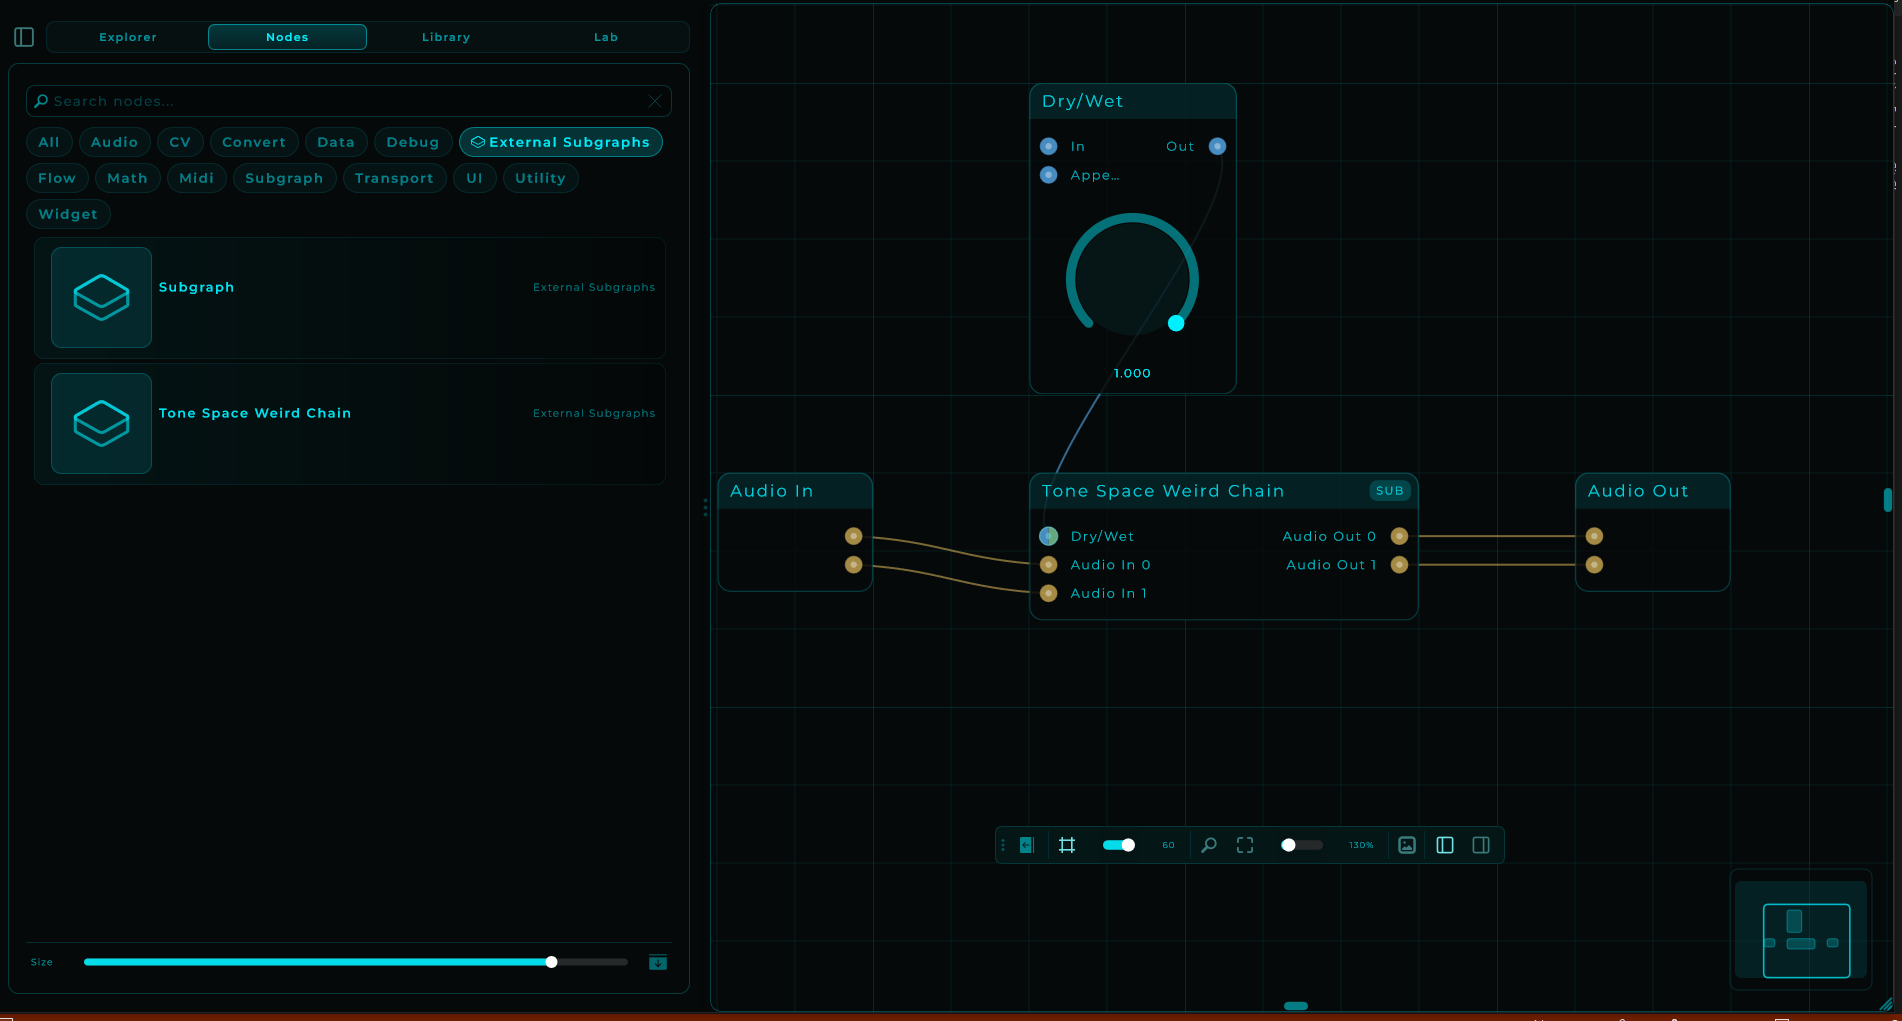
The image shows a saved Subgraph in its parent graph. In the current Explorer, use the Modules explorer's Subgraphs filter to find saved Subgraphs ready to insert.
Arranging the ports
The pins appear in the order the ports were created. To change it, select the subgraph node and open the Ports section of the Inspector: two lists, inputs and outputs. Drag a pin to where you want it; a line shows where it will land. Double-click a name to rename that port (the Sub In or Sub Out inside takes the new name). The container's own pins (Appearance, Show Panel, Bypass) can be moved too; only ports can be renamed. Only the order on the node changes, every cable stays connected, and the order is saved with the subgraph, so a saved subgraph or module keeps it wherever you place it. Modules and Poly Modules arrange their ports the same way.
Saving Subgraphs
You can save any subgraph as a reusable .mnsubgraph file:
- Right-click the header of the Subgraph node
- Select Save As Subgraph…
- Give it a name and save
Find your saved Subgraphs in the Modules explorer → Subgraphs view. Drag one onto another graph to reuse it. Save the containing project too if you want to keep the whole patch around it.
The default folder is Music → Mario Nieto → MNodes → Library → Subgraphs. Check or change it in Settings → Library.
Use Cases
| You need… | Choose |
|---|---|
| A tidier graph or reusable group with ports | Subgraph |
| A reusable processor with its own control panel | Module |
| Several separately allocated note voices | Poly Module |
| Several processing copies of an effect | Parallel Module |
| A surface for adding and patching rack-ready Modules | Rack Canvas |
- Custom instruments: Wrap an oscillator + filter + envelope into a "Synth Voice" subgraph
- Effect chains: Package a reverb + delay + compression chain as a single module
- Reusable modules: Build utility blocks you use across different patches
- Organization: Keep complex patches clean by grouping related nodes
Modules and Poly Modules
If you need a subgraph with its own built-in front panel (knobs, sliders, meters visible directly in the node body), use a Module instead. Modules are an enhanced version of Subgraphs with a dedicated control surface, preset system (.mnmod), and shareable Module Packs (.mnmodpack). Create one with Ctrl/Cmd + Shift + G.
For polyphonic instruments, where the same voice plays several notes at once, use a Poly Module. You build one voice and MNodes runs N copies in parallel for you.
Random Patch Generator
To generate a starting patch and then inspect its structure, use The Lab. Keep the Subgraph workflow above for grouping a selection you have already built.