
Appearance
Presets & Projects
You have a patch you want to keep. Save it as a project (.mnprt) to return to its graph, connections, Front Panel and settings later. MNodes also calls these files presets: the Save Preset window and the Preset Browser work with the same projects.
Start with Your first patch or any project of your own. This guide takes you through saving it, making a variation, opening it again and sending it to someone else.
Saving Presets
Choose the right save command
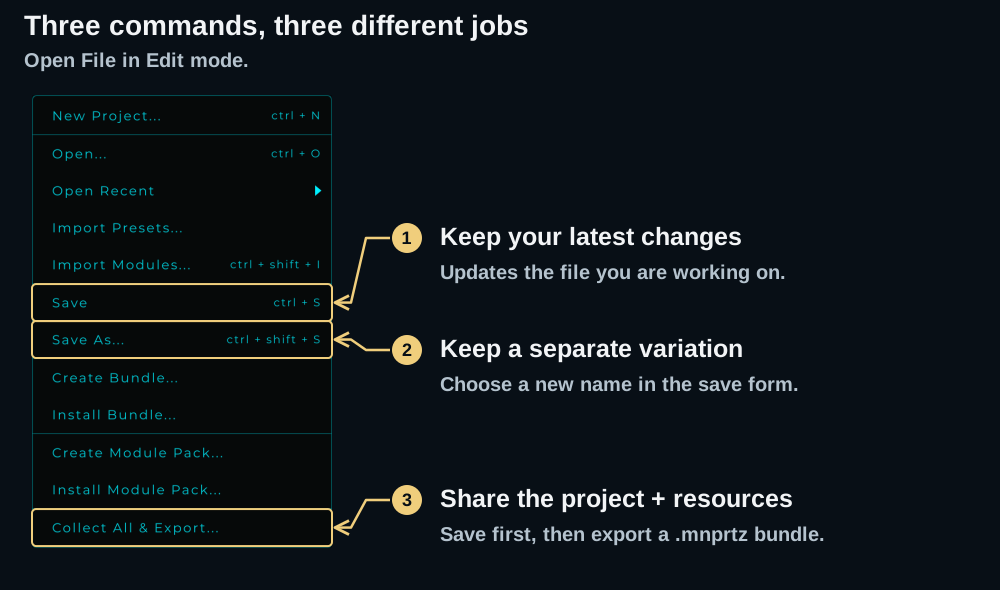
In Edit mode, open File. These three commands cover most of the work:
| You want to… | Use | What happens |
|---|---|---|
| Keep your latest changes | Save, Ctrl/Cmd + S | Updates the current file. For a new project or a Factory preset, opens the save form so you can make your own copy. |
| Keep the original and make a variation | Save As…, Ctrl/Cmd + Shift + S | Opens the form. Give the variation a new name and leave Overwrite current file off. |
| Send the project with its resources | Collect All & Export… | Creates a .mnprtz bundle. Save your changes first. |
Save your first project
- Choose File → Save, or press Ctrl/Cmd + S. The form is titled SAVE PRESET.
- Enter a Name, such as
First patch. This also becomes the filename. - Choose an Open Mode: Edit to reopen the graph, or Perform to open the performance view with your Front Panel. Use Edit while learning.
- Check Purpose. Choose Instrument, Effect, MIDI, Learn or Utility to describe what the project is for. For a tutorial patch, Learn is a useful choice.
- Add an Author, select useful Categories, and optionally write a Description. These help you recognize the project in the browser.
- Scroll down if necessary, then click Save.
For a new project, MNodes saves your copy under Projects/User in your Library. Selecting categories puts it in a subfolder named after the first selected category. For a project opened from another folder, the destination follows that file.
Keep a variation
Choose File → Save As…, change the Name to something like First patch variation, and leave Overwrite current file unchecked. Click Save. You are now working on the variation; the original remains available.
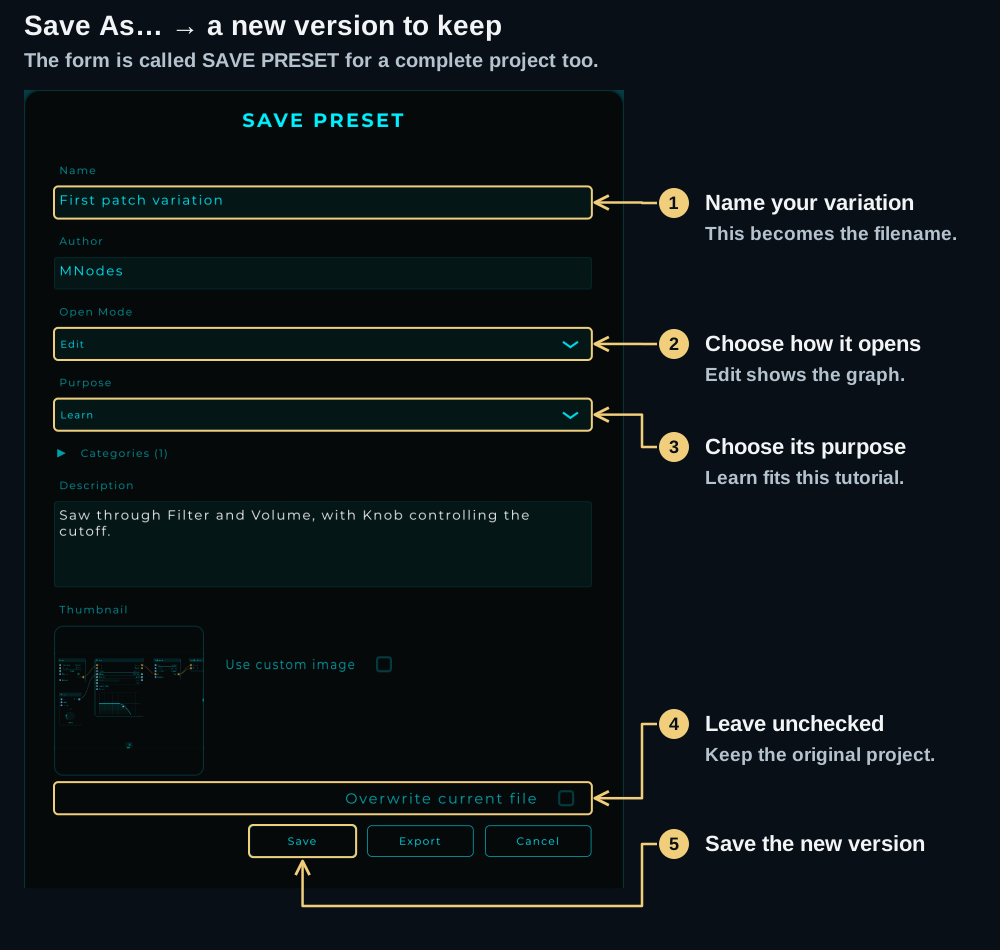
Overwrite current file is an explicit choice to replace the file you already have open, including its metadata. It is off by default in Save As and is unavailable for Factory presets. Reusing an existing filename can still produce a replacement prompt, so give a variation a distinct name.
Try it: save a variation, change one control, then press Ctrl/Cmd + S. The next Save updates that variation without asking for a name again.
Preset Metadata
Purpose answers what the patch is for. Categories describe the sound or task, such as Bass, Pad or Delay. Open Mode decides which workspace appears when you load it; it does not remove the graph or the Front Panel.
The Thumbnail normally comes from your graph in Edit mode or your Front Panel in Perform mode. Enable Use custom image to choose your own artwork. The Export button in this form saves the project and then offers to write an extra .mnprt copy elsewhere. For a copy that travels with samples and other resources, use Collect All & Export.
The file also stores creation and modification information and the plugin version. You can change a user preset's metadata later from the browser's right-click → Edit Info….
Preset Categories
Select categories that will help you find the project again. For example, a soft synth sound could use Pad, while an echo patch could use Delay. You can select more than one; expand Categories with its small arrow if the choices are collapsed.
Loading Presets
Open something from the Library
- Open Library from Home, or click the preset name in the editor's top bar to open the Preset Browser.
- Choose All Presets, User, Favorites or Recent in the left rail. Search by name if you know what you want.
- Double-click the project to load it, or right-click it and choose Load.
The project reopens in its saved Open Mode. Use Ctrl/Cmd + P to switch between Edit and Perform when needed. Deal with any unsaved-changes prompt before replacing the project you are working on.
Browser Layout
The controls above the results let you search, filter by type, sort by A - Z / Newest first / Oldest first, and switch between Cards and List. Size changes card size or list row height. If a saved project seems absent, clear the search and filters and check All Presets.
The Left Rail
User shows projects stored in the User library, with its subfolders underneath. Recent helps you return to something you opened earlier; Favorites shows the projects you marked with a heart. Collections are your own groups: use + to create one and drag projects onto it.
The rail also provides installed Bundles, category and purpose filters, and MNodes Hub content. A project opened from an external folder can appear in All Presets and Recent without being stored in User.
Right-Click Actions
Right-click a project to Load, Show Info…, add it to Favorites, Duplicate, Export…, or Show in Finder / Explorer. User files also offer Edit Info… and Delete. Factory presets are read-only; save your own copy to keep edits.
External projects have different file actions: Copy to Library, Locate… when missing, and Remove from Library. These are explained below.
Preset Storage Locations
Your Library normally lives in Music → Mario Nieto → MNodes → Library on desktop. Folder locations can be customized, so right-click → Show in Finder / Explorer is the quickest way to find a particular file. Check Settings → Library for the configured folders.
| Content | Default folder inside Library |
|---|---|
| Factory projects | Projects/Factory/ |
| Your library projects | Projects/User/ |
| Node presets | Node Presets/ |
| Subgraphs | Subgraphs/ |
| Modules | Modules/ |
| Module instance presets | Modules/Presets/<ModuleTitle>/ |
Projects outside the Library
Use File → Open… to open a .mnprt from a Downloads folder, a workshop folder or another drive. MNodes opens the file where it is and remembers its location. Opening it does not copy it into Projects/User.
Save writes back to that same file. Save As… creates the named variation beside the external project, without adding category subfolders. Keep the original folder available while you work.
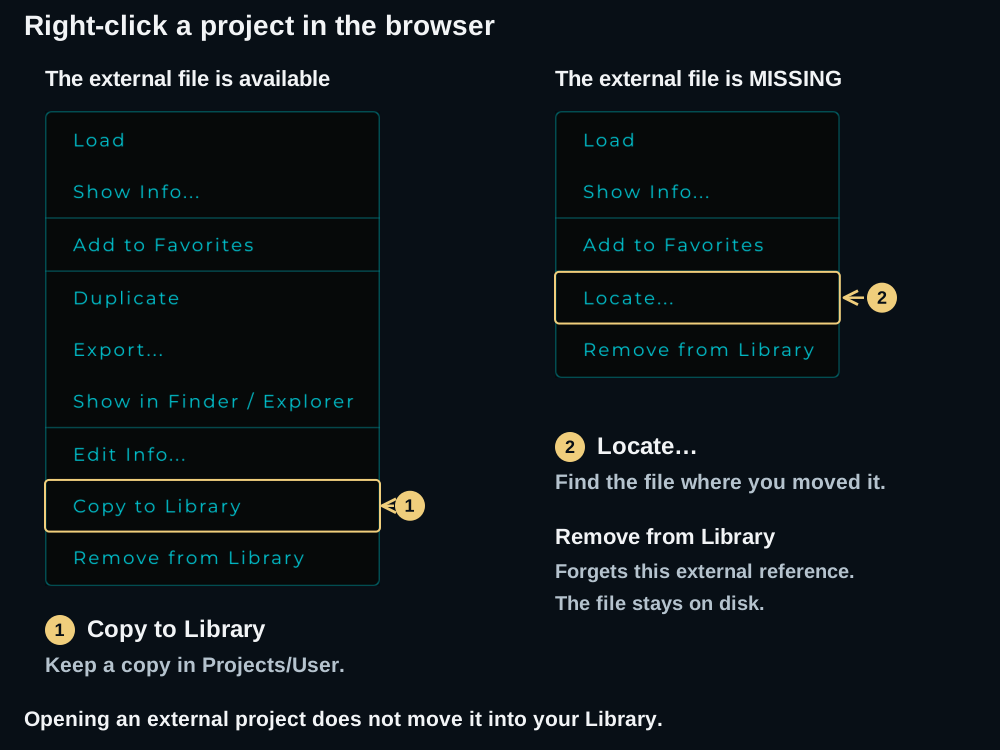
Use Copy to Library if you want a library copy. The original external file remains in place. If you intend to edit the library copy next, load that copy from User first.
If you moved or renamed an external file, its browser entry becomes MISSING after a rescan. Right-click it, choose Locate…, and select the file at its new location. If you no longer want the entry, Remove from Library forgets the reference and leaves the external file on disk. This differs from Delete on a file stored in the Library.
Import & Export
Share a project with its resources
A .mnprt contains the project state, but external samples and images may still live elsewhere on your computer. To send the project with its resources:
- Save the latest changes with Ctrl/Cmd + S.
- Choose File → Collect All & Export….
- Choose a filename and location for the
.mnprtzbundle. - Send that bundle. The recipient can bring it into MNodes with File → Import Presets….
Collect All & Export uses the last saved project state. It asks you to save if the project has never been saved, but an existing project still needs a Save after your latest edits. Exporting a bundle does not replace that step.
The collector includes referenced samples, images, filmstrips and wavetables, including assets inside modules and subgraphs. Samples referenced by presets stored in a Preset Manager are included too. A project using your own Rack Modules takes those with it. Keep the referenced files available when you export.
Bring in a project or bundle
File → Import Presets… accepts .mnprt projects and .mnprtz bundles. A plain project is listed at its existing location; a bundle is unpacked into your library folders. If a bundle project name is already present, read the prompt and choose whether to keep both or replace your copy.
For reusable modules, use File → Import Modules… with .mnmod or .mnmodpack. See sharing Module Packs for the module-specific workflow.
Preset Files
Choose a format according to how much you want to reuse:
| Keep or share… | Format | What it contains |
|---|---|---|
| A complete project | .mnprt | Graph, connections, Front Panel, settings and metadata. External resources may remain separate. |
| A project with its resources | .mnprtz | A portable preset bundle; use Collect All & Export for your current project. |
| One node's setup | .mnnpreset | A node preset, such as your Filter settings. |
| A reusable group of nodes | .mnsubgraph | A Subgraph. |
| A reusable instrument or processor with its own panel | .mnmod | A Module. |
| A Module with its resources | .mnmodpack | A Module Pack. |
| A placed Module's control settings | .mnmprst | A Module instance preset. |
MNodesHub
Open Hub from Home, or the MNodes Hub section in the browser, to discover and install shared content. You can also browse MNodesHub on the web. After installing a project, load it from your Library and save your own variation when you start changing it.
Recent Presets
Return to a project through Home's recent projects, the browser's Recent section, or File → Open Recent. Recent is a list of locations you visited, so moving an external file can leave an entry that needs Locate….
Dirty State
An asterisk (*) beside the project name means it has unsaved changes. Save to keep them in the current file, or Save As to keep a separate variation. A successful save clears the marker.
Before you move on
Make a variation, save it, load the original, and then load your variation again. Seeing both files in the browser is a useful check that you kept the two versions you intended.