
Appearance
The Lab
The Lab builds an instrument or an effects chain from a few choices. The result is a normal MNodes patch: you can play it, inspect its connections, change its nodes and save it as your own project.
| Start with… | The Lab creates… | To hear it, provide… |
|---|---|---|
| Instrument | A synth voice inside a Poly Module, followed by effects and an output | MIDI notes, or clicks on the generated keyboard |
| FX Chain | Effects between Audio In and Audio Out | Audio from your DAW track or standalone input |
For a first try without a MIDI controller, follow Generate your first instrument. To process an existing sound, go to FX Chains.
Opening the Lab
- Open a project in Edit mode so the graph is visible.
- Click Lab, the flask icon in the left sidebar. You can also use View → Panels → Lab.
- If the left panel is hidden, use View → Panels → Show Explorer or Ctrl/Cmd + Alt + E.
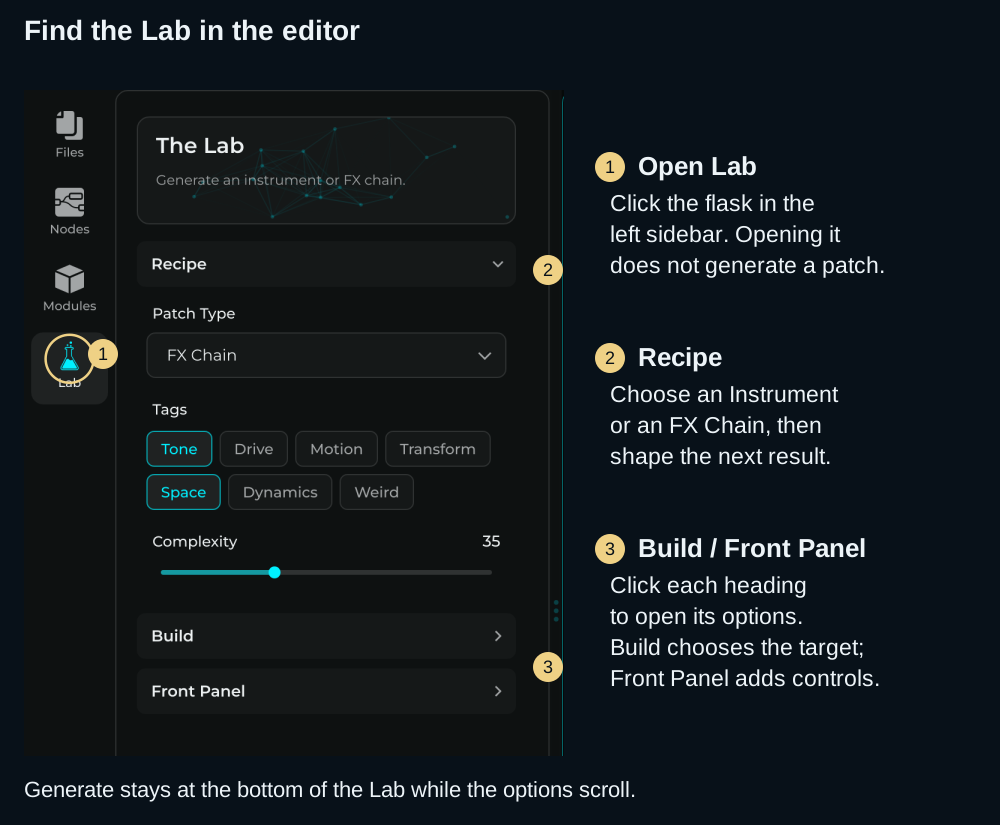
Opening the Lab leaves your patch as it is. Recipe, Build and Front Panel are expandable sections; click a heading to open it. Scroll the options if they do not fit. Generate stays at the bottom, with a short description of where the result will go.
Generate your first instrument
This example makes a playable pad with an on-screen keyboard. If you have a patch you want to keep, save it first.
- In Recipe, set Patch Type → Instrument.
- Select Pad under Flavours. Leave the other flavours and Weird off for this first try.
- Set Voicing → Poly, Voices → 4, Glide → Off, and Complexity to about 35.
- Open Build and enable Create new patch. Work at Root for this example: this option replaces the nodes in the graph you are currently editing.
- Open Front Panel and enable Generate Front Panel. Start with Theme → Night and Creativity around 30.
- Click Generate. MNodes builds the graph and opens its locked Front Panel, ready to play.
- Click and hold a key on the panel's MIDI Keyboard, then release it. A pad can take a moment to swell and fade. Turn a filter or oscillator control while holding a note to hear what it changes.
If the lower panel has too little room, drag the divider above it upwards. See Open the Front Panel editor. In standalone, select a working audio output in Settings; in a DAW, load MNodes Instrument on a track routed to your speakers.
Each Generate makes another result, even with the same settings. Ctrl/Cmd + Z undoes a completed generation as one step. Changing a Lab option sets up the next generation; it does not edit the instrument you already made.
Recipe: choose the sound
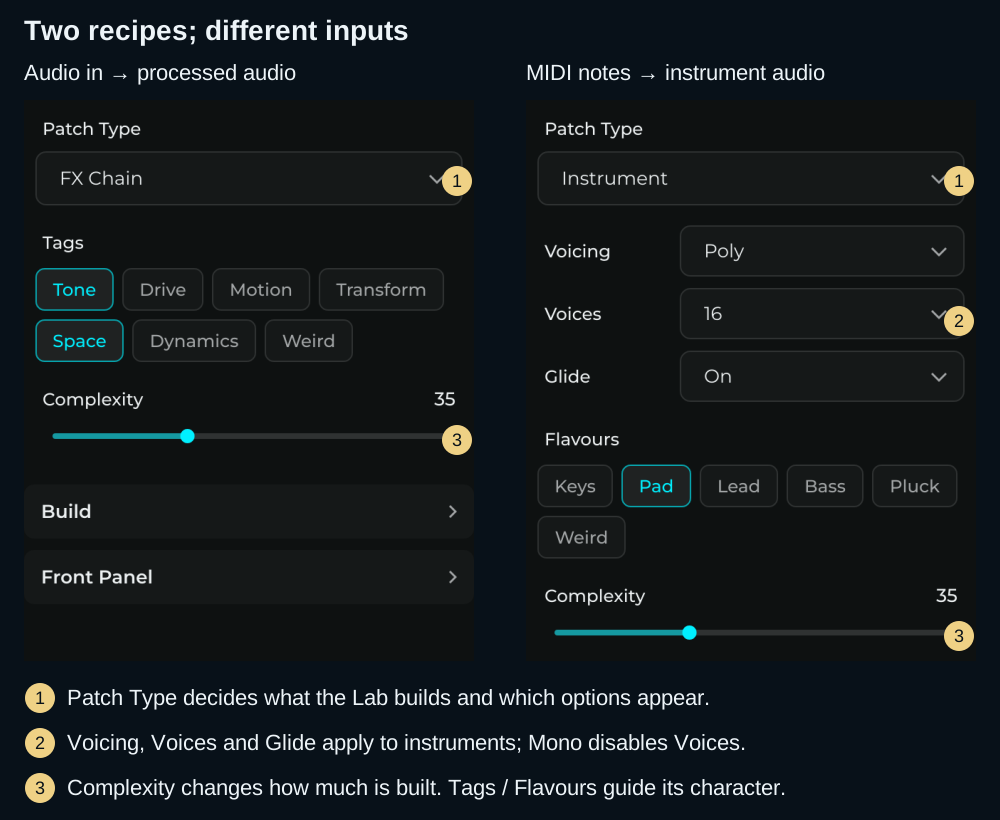
The screenshot shows two example configurations, including 16 voices and Glide On to identify those controls. The first exercise uses 4 voices and Glide Off.
Complexity runs from 1 to 100. Higher values allow more processing and, for instruments, additional voice features. Start lower when you want a patch that is easy to follow. The value is not a node count or a promise of a better sound.
Where the result goes
Open Build before generating into a project you have already started.
| Build choice | What happens when you press Generate |
|---|---|
| Create new patch on | Replaces the nodes in the current graph. At Root, this replaces the main patch; inside a container, the target is that internal graph. It does not create a separately saved project file. |
| Create new patch off | Adds the generated patch to the current graph. Check its connections alongside your existing sound path. |
| Wrap FX in subgraph | Packages generated effects in a reusable Subgraph. Available for FX Chain. |
| Replace selected subgraph | Rebuilds effects inside a selected Subgraph, or the one you have entered, while retaining its boundary ports. Available for FX Chain. |
Create new patch and Replace selected subgraph are mutually exclusive. The sentence above Generate reflects the selected destination.
For an FX replacement, select a Subgraph with at least two audio input ports and two audio output ports. Its internal processing is replaced. If no suitable target is found and Wrap FX in subgraph is also on, the Lab can create a new wrapped chain instead. To target only the existing Subgraph, turn wrapping off and select that Subgraph before generating.
FX Chains
An FX Chain processes incoming audio. It does not become audible just by pressing keys on a MIDI controller.
To try one in your DAW:
- Put MNodes FX on a track with an audio clip and start playback.
- Choose FX Chain, select Tone and Space, and set Complexity around 35.
- Enable Create new patch and Generate Front Panel; leave Wrap FX in subgraph and Replace selected subgraph off for this first chain.
- Generate, then move Dry/Wet between the original and processed sound. Change one effect control at a time while the clip plays.
In standalone, Audio In needs audio from an enabled device input. Without incoming audio, the chain will be silent. See DAW Integration and Audio / MIDI settings.
| Tag | Kind of processing it favours |
|---|---|
| Tone | Filters and tonal colouring |
| Drive | Saturation, soft clipping, waveshaping and bitcrushing |
| Motion | Chorus, phaser, flanger, tremolo, vibrato, unison, and tape wow and flutter at higher Complexity or with Weird |
| Transform | Pitch shifting, frequency shifting, ring modulation and vowel filtering |
| Space | Reverb, delay and spatial effects |
| Dynamics | Compression, limiting, expansion and transient shaping |
| Weird | More experimental choices |
You can combine tags. They steer the types of effects; Complexity also limits how much gets built. More tags do not guarantee a longer chain. With no tags selected, the generator falls back to Tone and Space roles.
The generated Dry/Wet control blends the whole chain with the incoming audio. It is separate from a reverb or delay's own Mix control.
Instruments
An Instrument recipe creates a Poly Module containing one voice, plus MIDI routing, effects and an audio output. With Generate Front Panel enabled, it also adds MIDI Keyboard so you can play without external hardware.
| Option | Choices | What to expect |
|---|---|---|
| Voicing | Auto / Poly / Mono | Poly allows overlapping notes. Mono uses one voice; the Voices selector is disabled. Auto lets the generator decide. |
| Voices | Auto / 2 / 4 / 8 / 16 | Maximum simultaneous voices when the result is polyphonic. More voices can use more CPU. |
| Glide | Auto / Off / On | Pitch sliding between notes. When generated, its time has a control on the panel. |
| Source | Auto / Subtractive / Supersaw / Wavetable / FM / Additive / Pluck | The synthesis the voice is built on. Auto lets the flavour decide, which is where the variety comes from. Name one to ask for, say, an FM pad. |
Choose a flavour to guide the instrument's character:
- Keys for keyboard-style articulation; Pad for slower, sustained textures.
- Lead for melodic lines; Bass for a lower-register sound; Pluck for short, decaying notes.
- Weird adds more unusual choices to the selected character.
With several main flavours selected, each generation chooses one of them; it does not layer all of them. With none selected, any of the five can be chosen. FX tags and Instrument flavours keep separate selections when you switch Patch Type.
With Source on Auto, the generator chooses from subtractive, supersaw, wavetable, FM, additive and plucked-string voice designs, with choices suited to the flavour, so two Pad generations can contain different nodes and sound quite different. Choose a Source to keep the synthesis and let the rest vary. After the voice, the effect that adds movement can be a chorus, a phaser, a flanger or a unison.
Read the patch it made
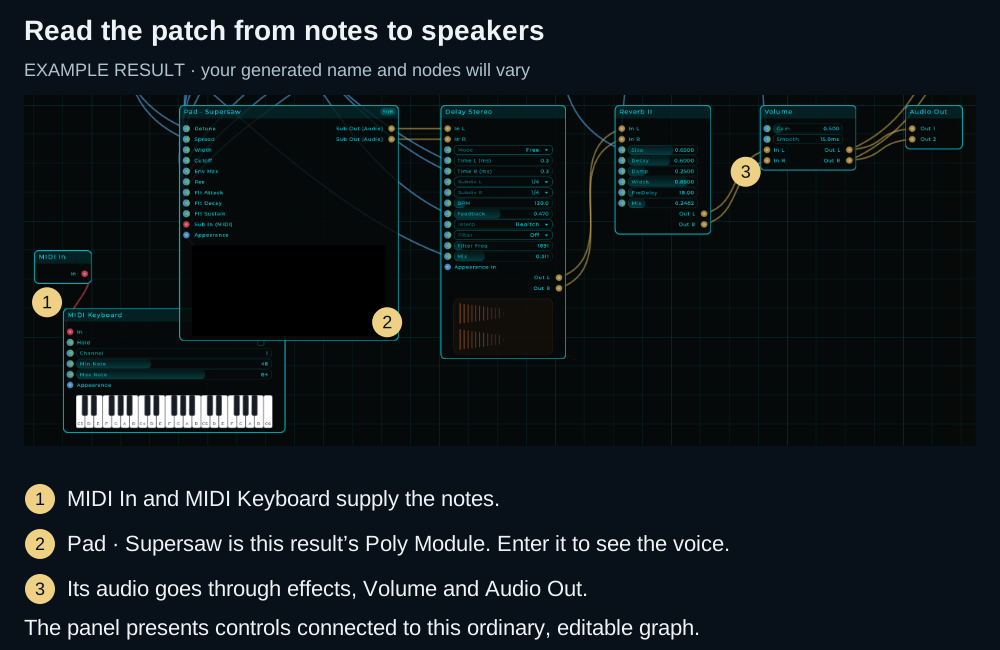
Here, Pad · Supersaw is the name the Lab gave its Poly Module. Other node names are shown as they appear in the patch. Your generated name and effects will vary.
Follow MIDI In → MIDI Keyboard → Poly Module, then follow the audio through the effects, Volume and Audio Out. Double-click the Poly Module to inspect its voice; use the breadcrumb to return to Root. The panel controls are connected to this graph. See Poly Modules for how voices work.
Generate Front Panel
Enable Generate Front Panel to create controls along with the new patch. An instrument's panel includes its keyboard and an amp-envelope editor; the exact sections depend on the generated nodes.
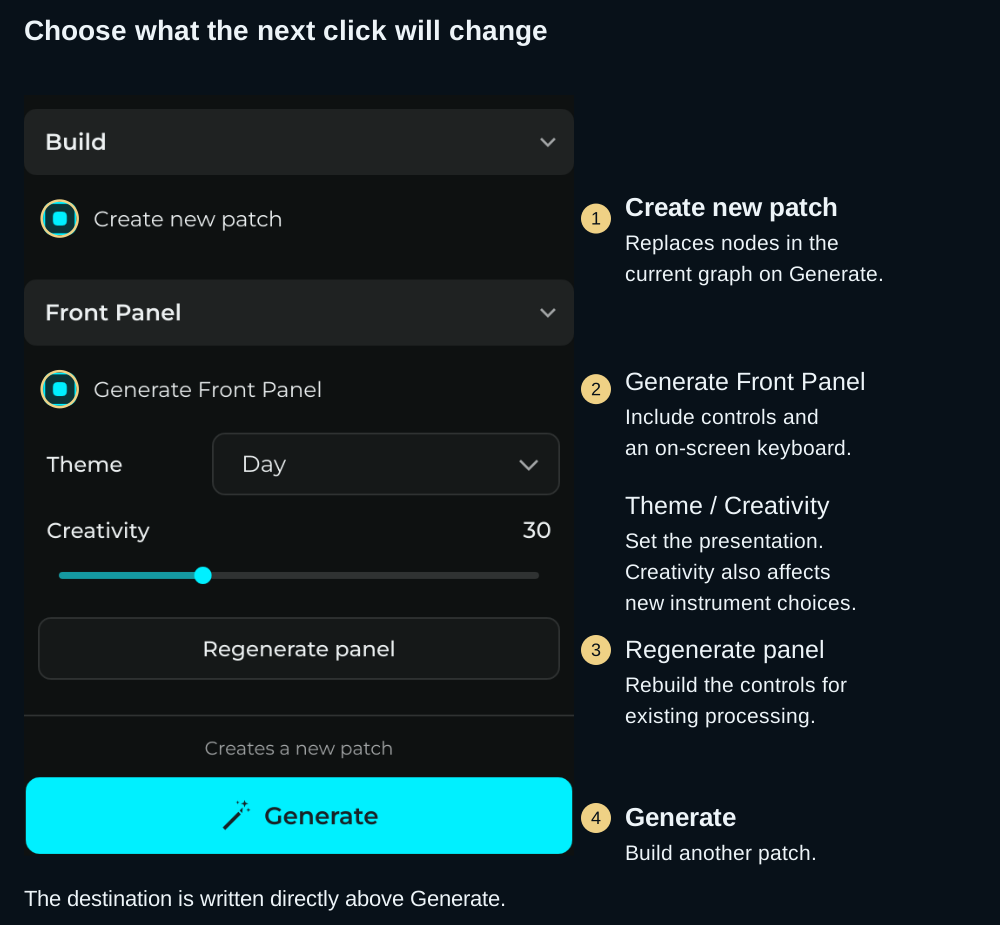
Theme chooses a Night or Day treatment for the generated panel. It is separate from the application's Appearance settings.
Every generated panel uses the same tidy layout: one section per stage, laid out in even rows, with one size of knob and a name on each section. A stage that can draw itself, such as a filter curve or a compressor display, shows that view beside its knobs. Creativity changes how the panel is dressed. Low values keep one accent colour and the standard knobs and sections. Higher values also pick a knob style, a section style and how round the corners are. Near the top, every section gets a colour of its own. When generating an Instrument, Creativity also influences some sound-design choices, including oscillator variations and filter resonance. Use Regenerate panel when you want a new presentation for existing processing.
The generator marks its knobs Expose to DAW. Displays and the keyboard are not ordinary automation knobs. See Parameter Automation to find an exposed control in your host.
Play the panel
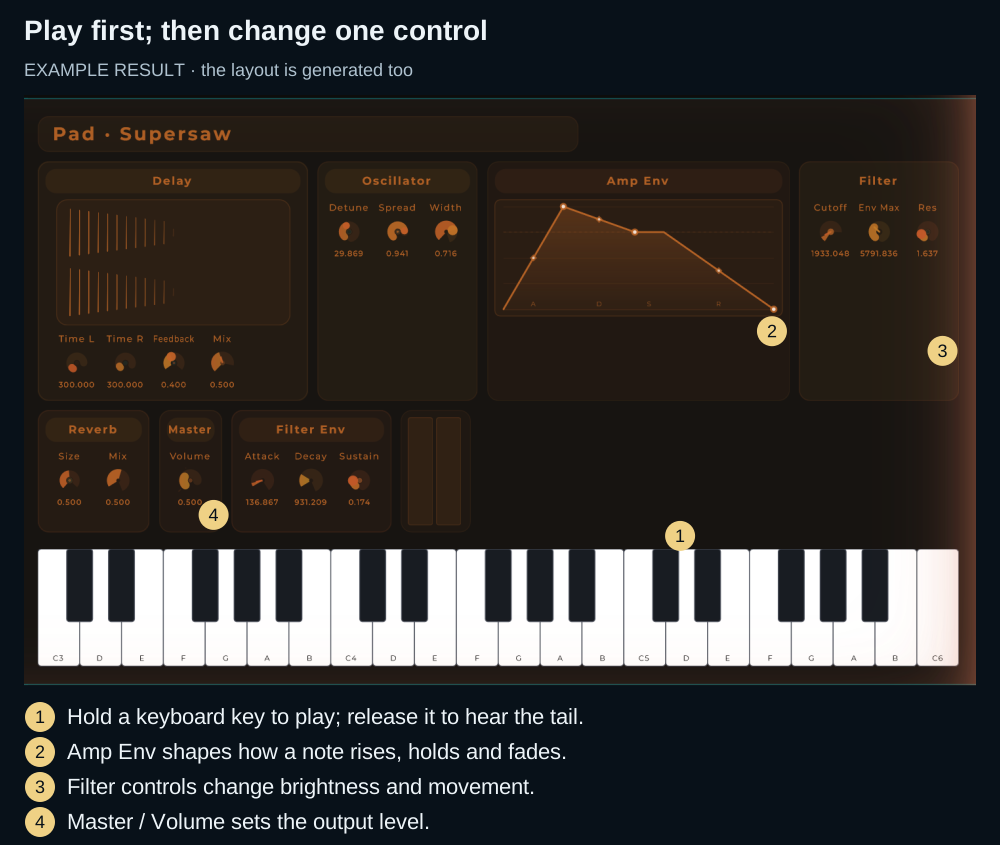
Start with the keyboard, then try the filter and envelope. Master / Volume changes the output level. This screenshot is one generated result, not a fixed layout every generation reproduces.
The panel opens locked so dragging operates its controls. To move a control instead, unlock the layout with the panel toolbar's padlock. See Panel lock and Edit / Perform mode.
Regenerate the panel without generating another patch
- Stay in the graph containing the generated instrument or effects. For the example, return to Root rather than remaining inside its Poly Module.
- Open Lab → Front Panel and enable Generate Front Panel if the style controls are disabled.
- Choose Theme and Creativity, then click Regenerate panel.
- Play the result and compare the arrangement. Use Ctrl/Cmd + Z if you prefer the previous panel.
Regenerate panel keeps the processing nodes and rebuilds panel widgets and layout for supported nodes in the current graph. For a generated instrument, it carries over the voice-control values, amp-envelope editor and keyboard.
It can replace hand-arranged controls and remove the existing panel layout. Save a variation before using it on a customised panel, and check DAW automation assignments afterwards because controls are rebuilt.
Keep a result and make it yours
- Use Save As to keep a result before the next Generate. Lab settings describe a recipe; the saved project preserves the actual graph and panel.
- Edit individual nodes or controls for a specific change. Press Generate when you want another whole result.
- Save a useful FX group with Save As Subgraph…, or a generated voice with Save As Module…. Save the complete project to retain its outer effects, MIDI routing and Front Panel too.
- Reduce unnecessary voices or effects and compare the sound. See Performance Tips.
Continue with Presets & Projects, Subgraphs or Poly Modules.
If the result is not what you expected
| What you notice | Check this first |
|---|---|
| An FX Chain is silent | Feed audio into Audio In. A MIDI note alone is not an audio source for the chain. |
| An Instrument is silent | Try its on-screen keyboard, then check output routing. Without Generate Front Panel, use MIDI In or add a MIDI Keyboard yourself. |
| Voices is grey | Voicing is Mono. Choose Poly to set a polyphonic voice count. |
| The panel is missing or too short | Enable Generate Front Panel for the next generation, or regenerate a panel for the current supported graph. Show the lower editor and drag its divider upwards. |
| The previous patch disappeared | Create new patch was enabled. Undo the generation, save what you want to keep, then choose the intended Build destination. |
| Replace misses the intended Subgraph | Select it, check for two audio inputs and outputs, and turn off Wrap FX in subgraph if you only want replacement. |
| Theme or Creativity did not change the current panel | These prepare the next build. Use Regenerate panel to apply a new layout to the current supported graph. |