Appearance
What is MNodes?
MNodes is a modular environment for playing and building instruments, audio effects and MIDI tools. It runs as a standalone app or as a plugin inside your DAW.
You can open a finished device and play its controls straight away. When you want to change how it works, open the editor and connect nodes: small building blocks that generate sound, process it or control other parts of the patch. A patch is the collection of nodes and connections that makes your instrument or effect work.
Play a device·Build a patch·Reuse your ideas
Start from Home
Home gives you a starting point before you reach the editor. You can open a featured device, return to your library or start a new project.
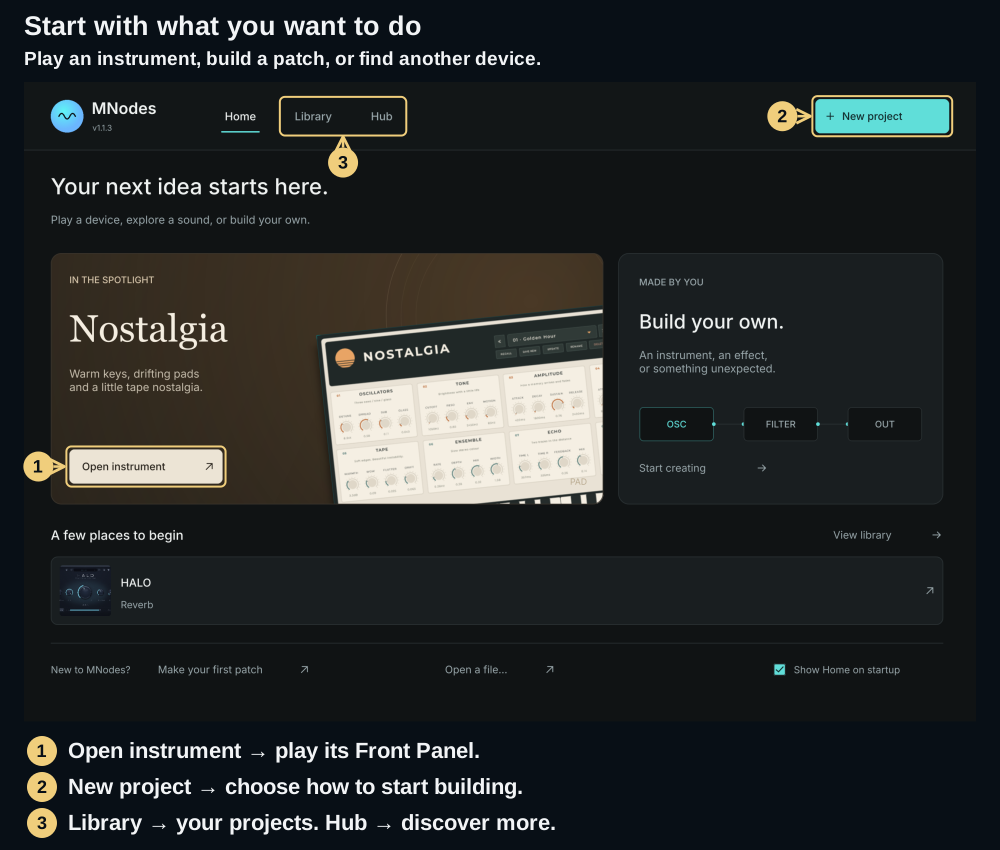
- Play: click Open instrument on the featured instrument. It opens in Perform mode, with its Front Panel ready to use. An effect may show Open device instead.
- Build: click New project, or Start creating, to choose a starting template.
- Browse: use Library for saved and installed projects, or Hub to discover more devices and collections.
Open a file… loads a project you already have on disk. Make your first patch takes you to the step-by-step beginner tutorial. To return here from the editor, choose View → Home. In Perform mode, open the MNodes logo menu and choose Home.
A device still needs something to play
Start with your listening volume low. An instrument usually needs notes from a controller, your DAW or an on-screen keyboard if the device provides one. An audio effect needs incoming audio. A MIDI effect produces or transforms MIDI messages, which need an instrument downstream to become sound.
If a device opens silently, check its input before changing the patch. MIDI explains how to check for notes, and audio setup covers the standalone device settings.
Find your devices: Library and Hub
Library is where you return to projects you have saved or installed. Search by name, narrow the type, mark favorites, or use Recent and your own collections. Cards show a visual preview; the list view gives you a more compact way to browse.
Hub is the catalogue for discovering instruments, effects, MIDI tools, modules and bundles. An item may need to be downloaded or installed before you can open it. A module is a building block to insert into a patch; it is not necessarily a complete playable project.
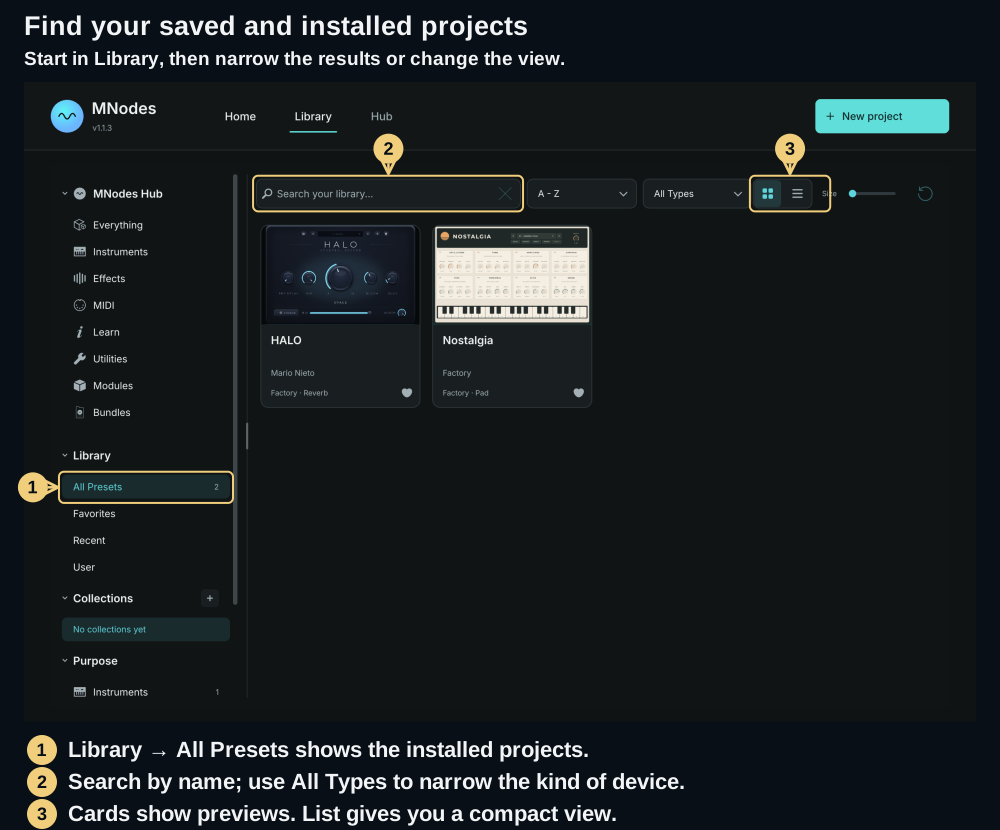
See Preset Library for organizing your projects and MNodes Hub for catalogue and installation actions.
Create your own project
Click New project, then click the kind of patch you want to create it and open the editor directly. The available choices depend on whether MNodes is running standalone, as an instrument, as an audio effect or as a MIDI effect.
| Starting point | What you get | Choose it when… |
|---|---|---|
| An instrument | A playable synth with MIDI and audio already connected | You want to start from a working sound |
| An audio effect | Audio input, a stereo volume stage and audio output | You want to process a track or incoming audio |
| A MIDI effect | MIDI input connected to MIDI output | You want to transform notes, rhythms or expression |
| An empty project | A blank graph | You want to build every connection yourself |
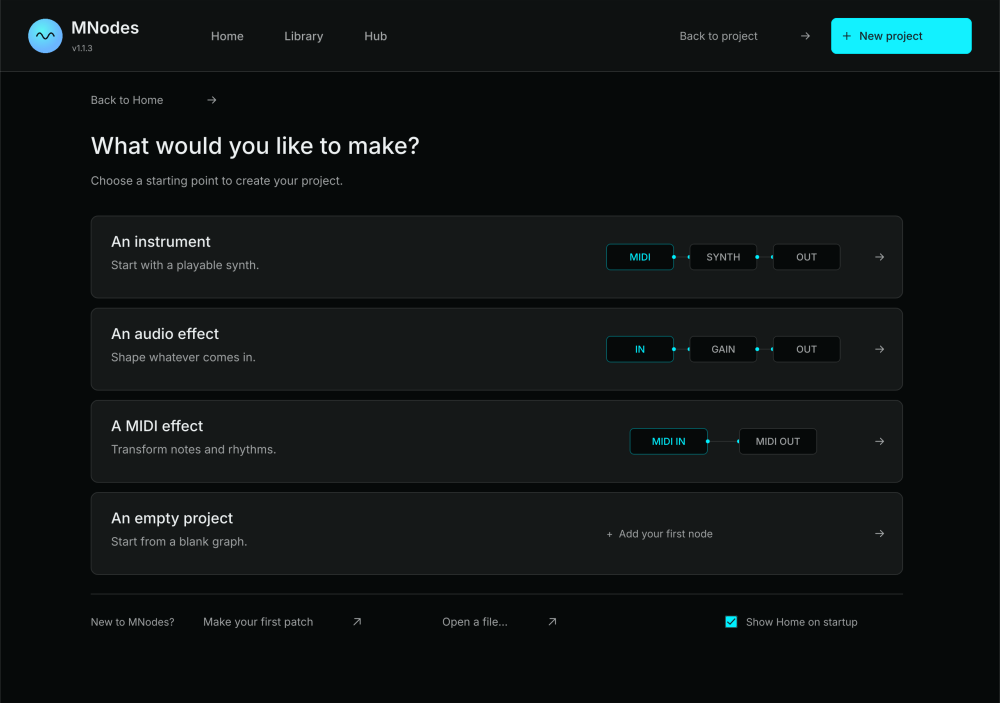
Creating a project opens the editor. You can keep the initial wiring, replace parts of it, or add your own controls as you learn. Save your current work before starting another project.
How the pieces fit together
Nodes
Each node has a job. Saw generates a tone, Filter shapes it, Volume sets its level, and Audio Out sends it to the output channels. Other nodes play samples, handle MIDI, create modulation or perform calculations.
The Graph Panel
The graph is where you build the patch: add nodes, arrange them and draw cables between their pins. The connections determine where sound and control signals travel. Zoom and pan to move around a large patch; use the minimap to find your way back.
You do not have to understand a large instrument's entire graph before playing it. Start with the three-node example in Your first patch, then learn the cable gestures in Connections & Wiring.
The Front Panel
The Front Panel is the control surface you use to play the patch: knobs, sliders, keyboards, displays and other controls. A patch can look like its own instrument or effect while its nodes and wiring sit behind that interface.
Edit mode shows the workspace for building. Perform mode gives the Front Panel the window for playing. Use the MNodes logo menu to choose Open in Edit Mode or Open in Perform Mode. In Perform mode, move the pointer to the logo at the top left to reveal the bar.
When building your own panel, the Front Panel walkthrough shows how to reveal its editor below the graph, add a control and position it.
Four Signal Types
The cable's type tells you what it carries. Colours below refer to the Default theme.
| Type | Carries | Example |
|---|---|---|
| Audio · gold | The sound, sample by sample | Saw → Filter → Volume |
| CV · mint green | A continuous control signal at audio rate | An LFO moving a filter's frequency |
| MIDI · red | Note, controller and timing messages | A keyboard telling a synth which note to play |
| Data · blue | Values and events when they change | A knob sending a new parameter value |
Some pins accept both Data and CV. You can learn those details when you reach hybrid pins; you do not need to memorise every signal type to open a device.
Subgraphs
You can group part of a patch into a Subgraph and reuse it. Modules package reusable parts with their own controls, while Rack Modules are marked for use in a rack. These let you build with larger pieces instead of recreating the same wiring every time.
The Modules explorer groups installed content into collections, with All, Modules, Rack and Subgraphs filters. Search across the library, or use a collection's magnifier to search inside that collection. See Subgraphs, Modules and Rack Canvas when you are ready to reuse or assemble your own devices.
The Lab
The Lab can generate a complete instrument or FX chain from a set of flavour tags, including its wiring and Front Panel. You can play the result and edit the patch it creates. See The Lab.
Choose the app or plugin for the job
Standalone (Windows, macOS)
Use the standalone app to run MNodes without a DAW. Select your audio device and MIDI inputs in Settings → Audio / MIDI. Audio, CV, MIDI and Data can all travel inside its patches; external audio and MIDI depend on the devices and routing you configure.
VST3 (Windows, macOS)
| Variant | Use it for |
|---|---|
| MNodes Instrument | Synths, samplers and other patches played from notes |
| MNodes FX | Processing audio on a track or bus |
Audio Unit (macOS)
| Variant | Use it for |
|---|---|
| AU Instrument | MIDI-controlled instruments |
| AU FX | Audio effects |
| AU MIDI FX | MIDI processing in a compatible host such as Logic Pro, feeding an instrument |
Your DAW manages the plugin's audio and MIDI routing. Choose a variant that provides the inputs and outputs your patch needs. See DAW Integration for the setup.
Find the next building block
Nodes are grouped by what they do, such as Oscillators, Filters, MIDI and Widgets. Search the Node Palette by the node's name, or browse the Node Reference for its parameters and pins.
Ready to build? Continue with Your first patch. To explore the workspace first, open The Interface.