
Appearance
Working with Nodes
A node does one job in your patch. Saw makes a tone, Filter shapes it, and Volume sets its level. You build an instrument by connecting those jobs, then adjusting their settings.
This guide uses Filter to explain the everyday actions. The examples use the original names you will find in the palette and reference. You can follow along in an empty project; to hear a Filter, give it an audio input and connect its output. Your first patch provides that signal path.
Adding Nodes
From the Node Palette (right-click)
- Right-click empty space in the graph. A node's header opens a different menu.
- Keep Nodes enabled and choose All to search across categories.
- Type Filter, then click the result named Filter. It appears where you opened the palette.
- Press Esc if you want to close the palette without adding anything.
The Nodes / Modules / VST3 switches determine which kinds of result appear. If a known node is missing, check Nodes and clear the category filter. See the illustrated Node Palette.
From the Node Explorer (sidebar)
Choose Nodes in the left icon strip to browse node types. If the sidebar is hidden, use View → Panels → Show Explorer, or Ctrl/Cmd + Alt + E.
Browse the categories, read a node's description and look at its preview, then drag it onto the graph. This is useful when you know the job you need but have not chosen a node yet.
Organised by Purpose
Categories describe what a node does: Oscillators make source signals, Filters shape a spectrum, Envelopes shape change over time, and Widgets provide controls such as Knob and Slider. They are separate from the pin types that determine how nodes connect.
The palette can also add saved modules and subgraphs when Modules is enabled. Installed content determines which groups and results are available. See Modules and Subgraphs for saving and reusing a group of nodes.
Read a node before you change it
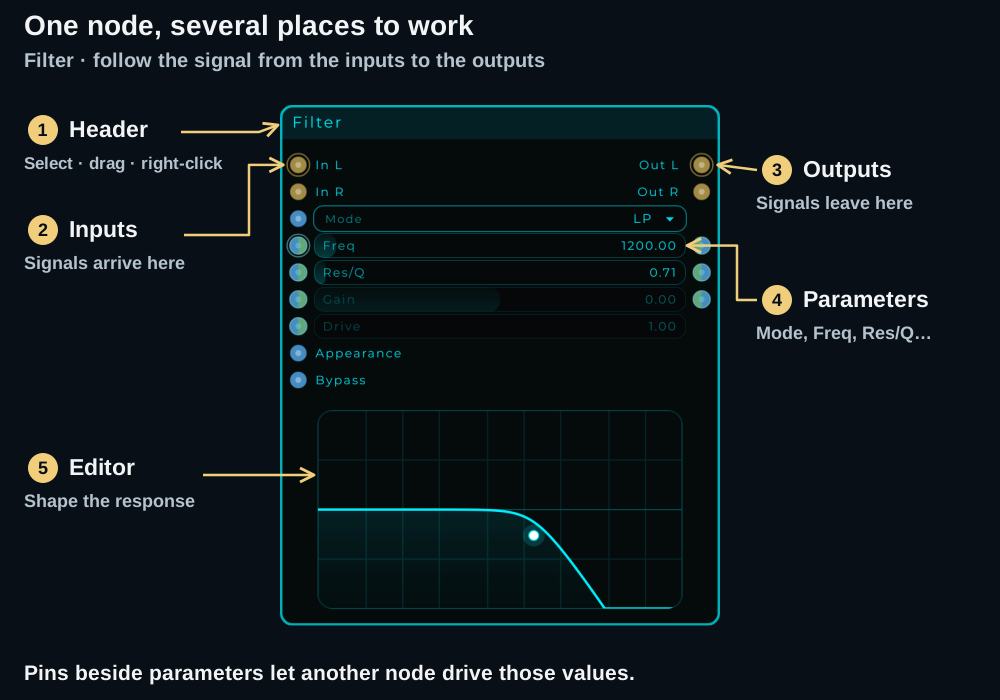
| Part | How you use it |
|---|---|
| Header | Select or move the node; right-click for its actions |
| Parameter rows | Change settings such as Filter's Mode, Freq and Res/Q |
| Pins | Connect signals: inputs are on the left, outputs on the right |
| Editor inside the node | Work directly with the node's visual control, such as Filter's response display |
A pin beside a parameter lets another node drive that setting. For example, a Knob can control Filter's Freq. If a setting keeps following an incoming connection, inspect that connection as well as the value you entered. Connections & Wiring explains the signal types and hybrid pins.
Selecting Nodes
Use the header to select a node without turning one of its controls.
| To… | Do this |
|---|---|
| Select one node | Click its header |
| Add or remove a node from the selection | Shift + click its header |
| Select an area | Drag a selection box from empty canvas |
| Select all nodes in this graph | Ctrl/Cmd + A |
| Clear the selection | Click empty canvas |
Try it: select Filter, then Shift-click Volume. Both should be selected. Shift-click Volume again to leave only Filter selected.
Moving & Resizing
Drag a node by its header. When several nodes are selected, dragging a selected header moves the group. Dragging a knob or value inside the body adjusts that control instead.
Resizable nodes have resize handles at their edges or corners. Drag an available handle to give the editor more space. Each node has its own minimum size; not every edge is resizable.
Use Grid & Snap on the graph toolbar to align nodes. Use Fit to view to find the selection, or clear the selection first to fit the whole patch. The Interface shows those controls.
Copy, Paste, Duplicate
| Action | Shortcut |
|---|---|
| Copy the selection | Ctrl/Cmd + C |
| Paste | Ctrl/Cmd + V |
| Cut | Ctrl/Cmd + X |
| Duplicate | Ctrl/Cmd + D |
| Delete | Delete or Backspace |
Select the whole group you want to reuse before copying. The copies keep the saved node settings and the connections between the copied nodes. For example, copy Filter and Volume together to keep their connection; selecting Filter alone does not include Volume.
You can also hold Ctrl/Cmd while dragging a header to duplicate and move the selection. The header menu offers Copy Node (or a count such as Copy 2 Nodes for a group), Duplicate Selected and Delete Selected.
A Frame brings the nodes inside it along when copied, cut or duplicated. Deleting the Frame removes the frame itself, leaving its contents in the graph.
Node Parameters
Select a node and use the Inspector on the right for its settings. To open it directly, right-click the node's header and choose Show in Inspector.
Double-clicking an ordinary node's header also opens its Inspector; double-click the same header again to close it. Subgraph, Module and Poly Module headers open their internal graph instead. Frame and Comment have their own editing behaviour.
For Filter, expand Main, then change Freq. You are editing the same setting shown on the node. The Inspector can also contain settings that have no row on the node, such as appearance and panel options.
If controls seem to be missing, clear the Inspector's search field. If it keeps showing a different node, unpin its header. See Inspector search and pinning.
Parameter Types
| Control | How to use it |
|---|---|
| Number / slider | Drag to adjust; double-click its value to type a number |
| Choice / dropdown | Pick a named option, such as a filter Mode |
| Toggle | Switch a setting on or off |
| Trigger button | Fire an event once |
| Text field | Enter text |
| Color or file picker | Choose a color or a file |
Type a Note Name into a Number Slider
Numeric sliders also accept a note name and convert it to frequency in Hz. For example, double-click Filter's Freq, type C3 and press Enter: in MNodes, C3 is middle C, about 261.63 Hz. Sharps and flats such as C#5 and Eb2 work too.
This conversion produces a frequency, so use it where Hz makes sense. It does not turn an unrelated numeric parameter into a pitch control. Integer fields round to a whole number, and the parameter's range still applies.
A choice parameter driven through a pin can also receive its option label instead of a numeric index. Matching ignores case and spaces. Use the labels offered by that node's own dropdown.
Parameter Features
- Lock on a parameter row: excludes that parameter from randomization and States capture/recall. You can still change its value manually. Locks are available for parameters that States can capture.
- Randomize and Reset: change a parameter or a group of settings; hover over an icon to check its scope.
- Range and step: limit the values a control accepts and how it increments.
- DAW exposure: makes eligible parameters available to the host. See Parameter Automation.
The row lock is separate from the Inspector's search padlock and header pin. Those keep a search or a node in view; they do not protect parameter values.
To give a node a custom title in your own projects, use Rename Node… in its header menu or double-click the Inspector title. The examples in this guide keep the original names.
Show UI Only
Some nodes combine parameter rows with a graphical editor. Show UI Only gives that editor more room by hiding the rows.
- Right-click Filter's header and choose Show UI Only.
- Drag its bottom edge upward to make the node shorter. The response editor uses the smaller body, and the pins wrap into extra columns when they need more room.
- Hover over a pin to read its name. The pins and their connections remain available.
- Use Show Params in the same menu to bring the rows back.
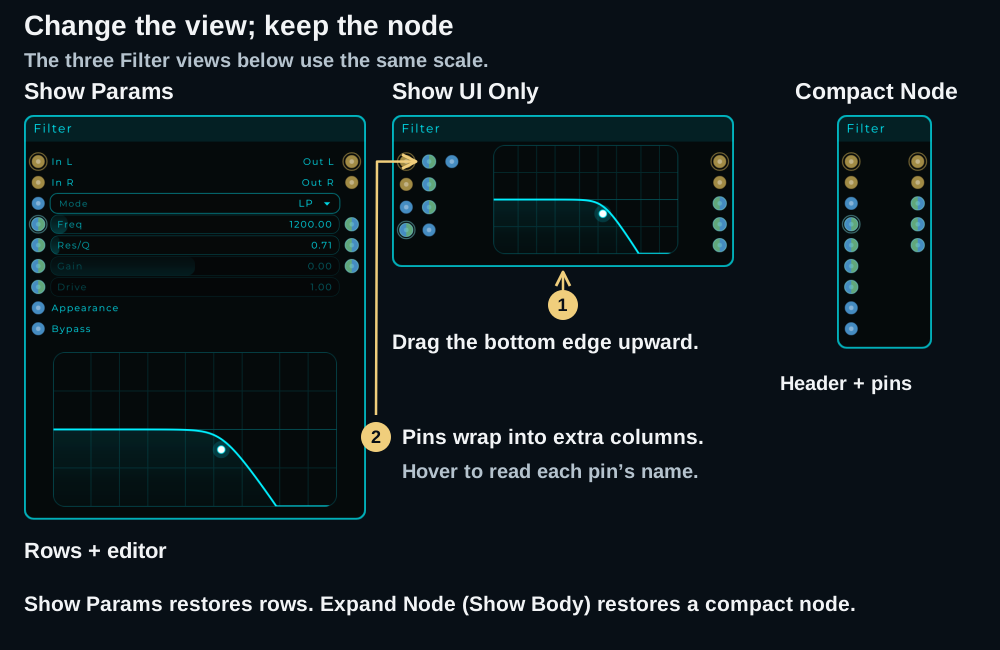
Ctrl/Cmd + U toggles Show UI Only for supported nodes in the selection. The same action is available from View → Show UI Only / Show Params. You can resize the node after hiding the rows; the Inspector still provides its parameters.
Compact Node is a separate command: it hides the body as well, leaving a small node with its name and pins. Use Expand Node (Show Body) to restore it. Hover over a pin to read its name when the rows are hidden.
Hide Unconnected
A node that is already wired often shows many rows you are no longer using. Hide Unconnected keeps only the rows and pins that have a cable, so the node becomes as short as its connections.
- Right-click the node's header and choose Hide Unconnected, or select the node and press H.
- The rows and pins without a cable step aside and the node gets shorter. If the node has a graphical editor, the editor stays as it is.
- Three dots in the header show that the node is hiding something.
- Choose Hide Unconnected again, or press H, to bring everything back.
Nothing is disconnected and the sound does not change. The hidden parameters keep their values, and you can still edit them in the Inspector. A hidden pin cannot take a cable, so to connect something new press H, make the connection, and press H again. While the option is on, a row appears when its pin gets a cable and steps aside when the cable is removed.
The option belongs to each node, is saved with the project and can be undone. With several nodes selected, H or the header menu changes all of them. It also works together with Show UI Only and Compact Node, which then show only the connected pins.
In the header menu, a command that has a keyboard shortcut shows it beside its name. If you change a shortcut in Settings, the menu shows the new one.
Node Presets
A node preset saves one node's settings for use on another node of the same type. A project preset saves the patch. Use a node preset when you want to keep a useful Filter setup without copying its surrounding nodes.
Save a setting you want to reuse
- Select Filter and adjust its settings.
- In the Inspector, expand Node Presets.
- Click Save As…, enter a name such as Warm low-pass, and confirm.
- The saved preset appears in the list for Filter. The node itself is still named Filter.
You can also start from the node header's Save As Node Preset… command.
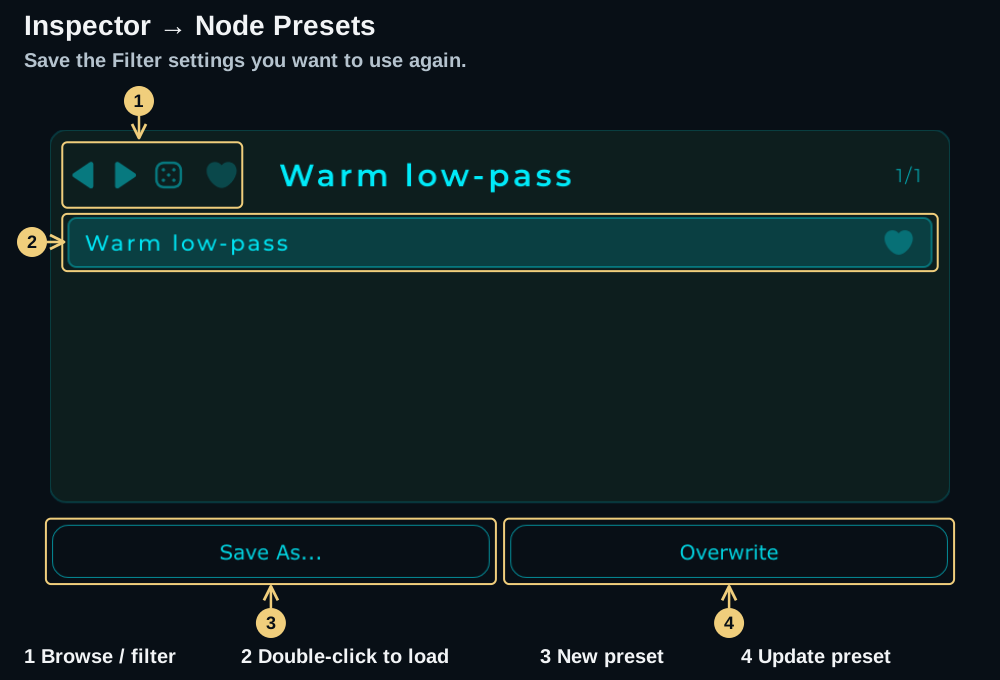
Load it again
Double-click a preset row to apply it, or right-click the row and choose Open. A single click selects a row without applying it. The previous/next arrows load adjacent presets; the die loads a random preset from the visible list.
Try it: save Filter with Freq = 1200, change Freq to 3000, then double-click your saved preset. Freq should return to 1200. Use an unconnected Freq input for this exercise so another node is not driving the value.
Save As… creates a named preset. Overwrite updates the current user preset; it is unavailable for Factory presets. The heart on a row marks a favorite, and the heart above the list filters to favorites. If the list looks empty, check that filter.
Use Set Current As Default in the node header menu if you want that setup for newly created nodes of the same type. This affects future instances, so choose it deliberately after you like the settings.
Node presets use the .mnnpreset extension and live in your Library's Node Presets folder. Right-click a saved row to reveal its file or export it. The library location can be changed in Settings, so revealing the file is more reliable than looking in a hard-coded folder.
Node Help & Live Examples
The fastest way to investigate an unfamiliar node is its own Help… command.
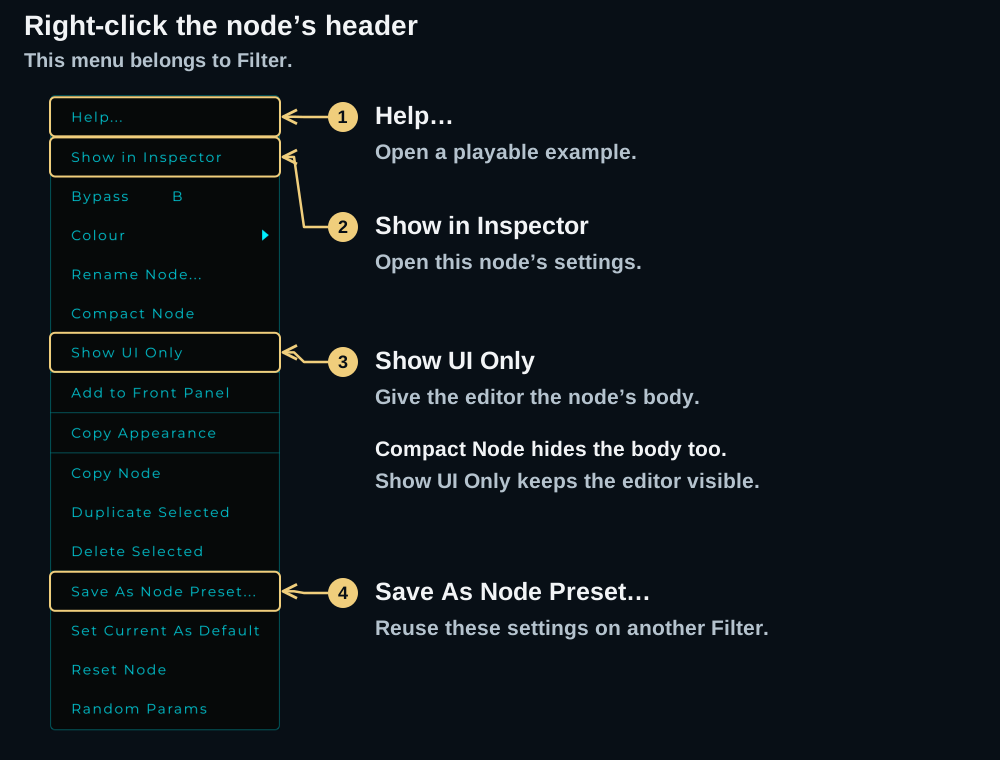
- Right-click the node's header → Help….
- A separate window opens with an authored example, or a generated page containing the description, parameters and a live instance of the node.
- Try its controls. Audio examples include a signal path to an output, and can make sound as soon as they open.
- Close the window to return to your patch.
You can copy a useful group out of Help: select the nodes in its graph, Ctrl/Cmd + C, then paste into your own project. The header menu's Copy Node command also copies a selection and shows its node count. While editing a Front Panel, a widget's right-click menu provides Help… too.
The Help patch is temporary and is not saved as part of your project. If undoable edits were made while Help was open, closing it clears the undo history. Finish any undo work you need before closing that example.
Undo / Redo
Use Ctrl/Cmd + Z to undo an edit such as adding, moving or deleting a node. Redo is Ctrl + Y on Windows and Cmd + Shift + Z on macOS. Both are also in Edit.
Click outside text fields before using graph shortcuts. If you are unsure what will change, check the current selection first.
Ready to connect the nodes? Continue with Connections & Wiring, or follow Your first patch to hear a complete example.