
Appearance
MIDI: play your first synth
The first patch makes a continuous tone. This time, make it play different notes when you press a key, and fade out when you release it. You can use the on-screen keyboard; no MIDI hardware is required.
MIDI carries instructions such as “start note 69” and “release note 69”. It carries no audio. The oscillator makes the sound, and an envelope controls its level over time.
Play a note→Choose its pitch→Shape its level→Hear it
Try the finished patch
Download: your first playable synth
- Save your current work, then open the downloaded
.mnprtwith File → Open. - Start with your listening volume low. Find the Volume just before Audio Out (the lower of the two Volume nodes in the download). It is set to 0.10 Linear; set its Gain to 0 whenever you want to mute the patch.
- Find MIDI Keyboard on the graph. Leave Hold Off, then press and hold one of its piano keys with the mouse.
- Release the mouse button. The note should fade out in about 250 ms. Press a different key to change the pitch.
Silence before the first note is correct. If nothing happens when you play, use the checks below. Click any image to enlarge it.
1. Check that notes arrive
To build this yourself, start with an empty graph. Right-click the canvas, search the Node Palette, and add MIDI Keyboard, MIDI Monitor and MIDI In. Expand the nodes to see their controls.
Connect MIDI Keyboard Out → MIDI Monitor MIDI. The keyboard’s Out pin is its MIDI output. These pins and cables are red in the Default theme. Leave Hold Off on the keyboard, and Freeze Off / Channel All on the monitor.
Press a piano key, then release it. The monitor should show a Note On message followed by a Note Off. At this stage you will not hear anything: there is no sound generator yet.
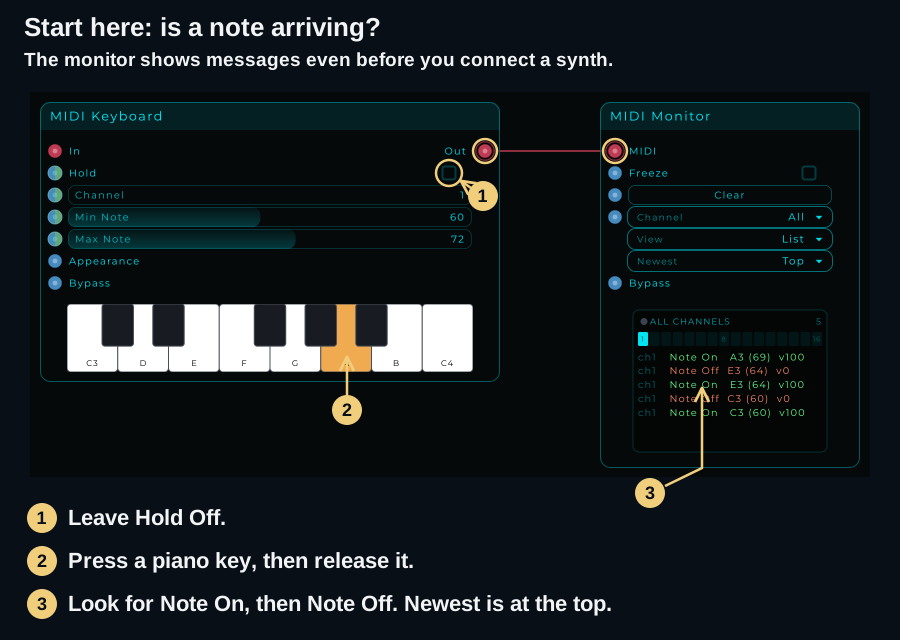
Standalone mode
To use a physical controller, select its MIDI input in Settings → Audio / MIDI, then connect the output of MIDI In to MIDI Keyboard In. See audio and MIDI setup.
The output pin on MIDI In is labelled In: it means MIDI coming into MNodes. The keyboard passes those messages through and adds any notes you play on screen.
Plugin mode
Load MNodes on an instrument track in your DAW. Send notes from a MIDI clip or your controller to that track; enable input monitoring or record-arm if your DAW requires it. Connect MIDI In → MIDI Keyboard as above.
If on-screen notes work but controller notes do not, keep the synth wiring as it is and check the DAW's input and track routing. You can also connect MIDI In directly to MIDI Monitor to inspect what the host sends.
2. Give the oscillator a pitch
Add MIDI To CV, Saw and Envelope. Draw a second cable from MIDI Keyboard Out to MIDI To CV In; keep the existing monitor branch.
MIDI To CV translates the messages into continuous control signals. For this patch, use two of its outputs:
| Connect | Why |
|---|---|
| MIDI To CV Note Hz → Saw Frequency | Sets the oscillator's pitch in hertz |
| MIDI To CV Gate → Envelope Gate | Tells the envelope whether a note is being held |
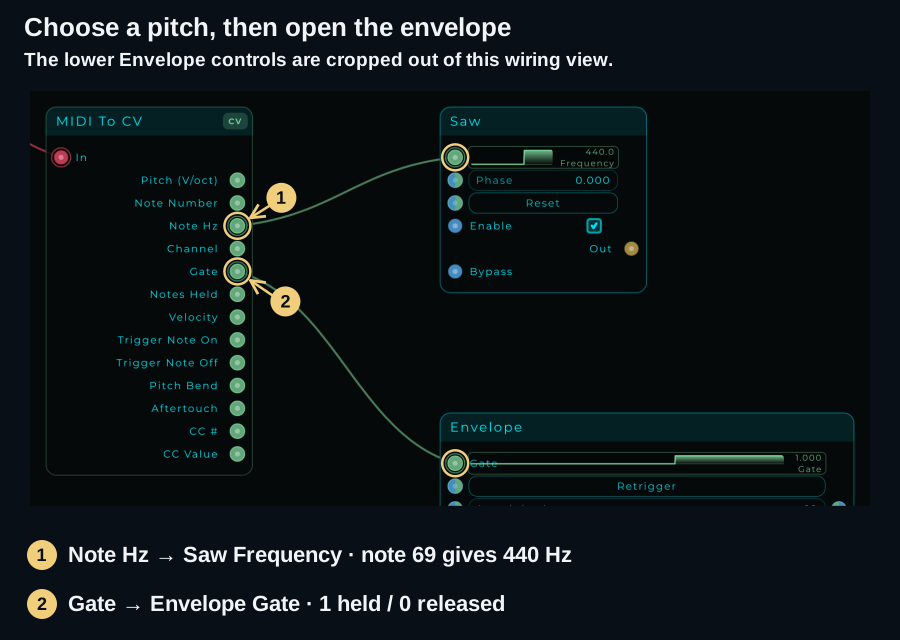
Note Hz, Pitch and Note Number are different
For MIDI note 69, these outputs carry different values:
| Output | Value | Meaning |
|---|---|---|
| Note Hz | 440 | Frequency in Hz, use this for Saw Frequency |
| Note Number | 69 | The MIDI note's numeric identifier |
| Pitch (V/oct) | 0.75 | Octave-scaled pitch, with MIDI note 60 as zero |
Use Note Hz for this Saw input. Connecting Pitch (V/oct) directly sends 0.75 instead of 440; the units do not match. Note names can use different octave numbering in different apps, so MIDI numbers are the clearest reference here.
Gate is held; a trigger is brief
Gate stays at 1 while at least one note is held, then returns to 0 when all notes are released. The Envelope follows that hold/release state. Trigger NoteOn is a short pulse at each new note; it does not describe how long you hold the key.
This example is monophonic: the most recently pressed note sets the pitch. If two notes overlap, releasing the newest returns to the older held note. Gate stays high across that overlap, so the envelope continues instead of restarting. Release every key between notes while learning the envelope.
3. Let the envelope control the sound
Add two Volume nodes and an Audio Out. Keep both nodes' original name, Volume. The first Volume, directly after Saw, follows the envelope. The second Volume, just before Audio Out, sets your listening level. In the download they are arranged one above the other: first on top, second below.
Set the values below before completing the output wiring. Click a node to edit its parameters in the Inspector, or use its expanded controls.
| Node | Settings |
|---|---|
| Saw | Enable On; Frequency will come from Note Hz |
| First Volume, after Saw | Unit Linear · Gain 0 · Smooth 0 ms |
| Second Volume, before Audio Out | Unit Linear · Gain 0.10 · Smooth 15 ms |
| Audio Out | 2 channels |
Make these connections:
| From | To | Carries |
|---|---|---|
| Saw Out | First Volume In | Audio: the raw tone |
| Envelope CV | First Volume Gain | CV: the changing level, from 0 to 1 |
| First Volume Out | Second Volume In | Audio: the shaped note |
| Second Volume Out | Audio Out Out 1 and Out 2 | The same mono sound to both speakers |
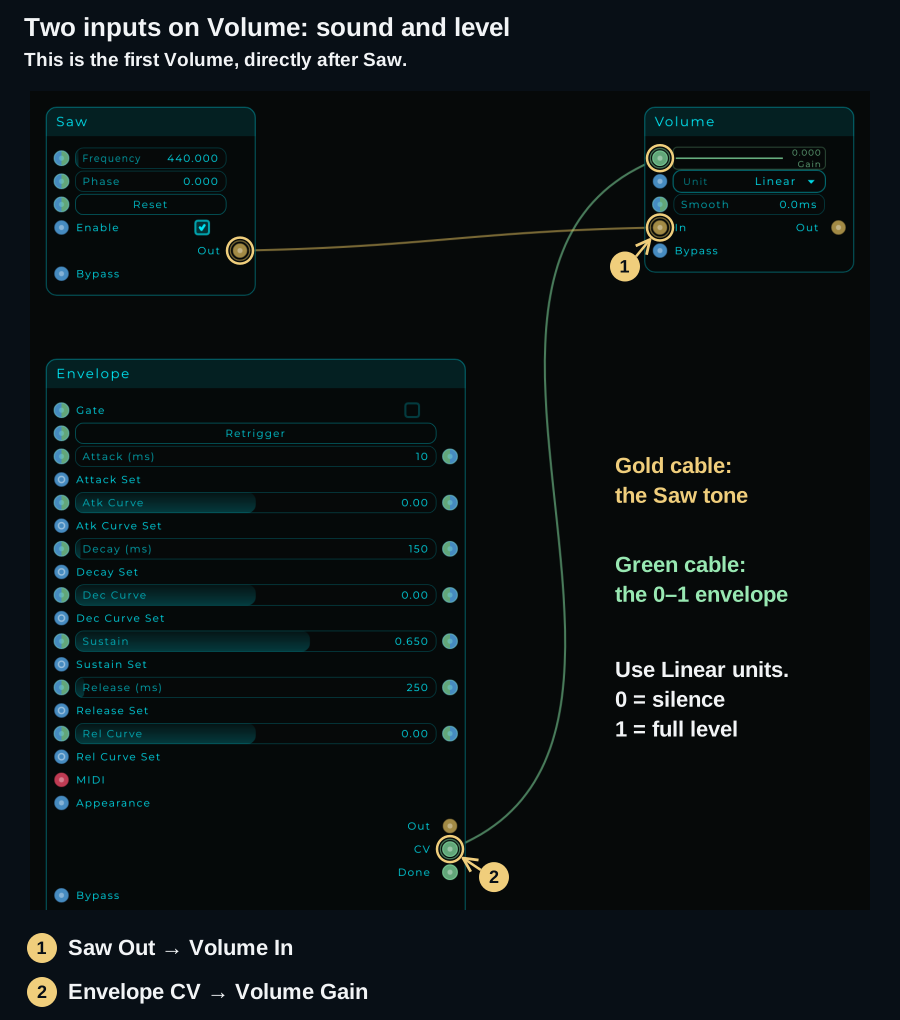
Use the Envelope's CV output for this connection. Its Out pin is an audio-format envelope signal, not the oscillator's sound. Linear units matter too: a CV level of 0 means silence and 1 means full amplitude before the second Volume. In dB units, 0 would mean unity gain.
The CV cable controls Gain on the first Volume while it is connected. Adjust Gain on the second Volume to change the overall level; editing the first Volume's stored Gain will not override the incoming envelope. This is the same hybrid-input behaviour used elsewhere in the graph.
4. Shape the start, hold and release
An ADSR envelope moves through Attack, Decay, Sustain and Release. Set these values on Envelope, leaving the three Curve values at 0:
| Control | Set it to | What you hear |
|---|---|---|
| Attack (ms) | 10 | A quick rise from silence to full level |
| Decay (ms) | 150 | The level falls from the peak toward Sustain |
| Sustain | 0.65 | The level stays at 65% while the key remains held |
| Release (ms) | 250 | After you release the key, the level fades to zero |
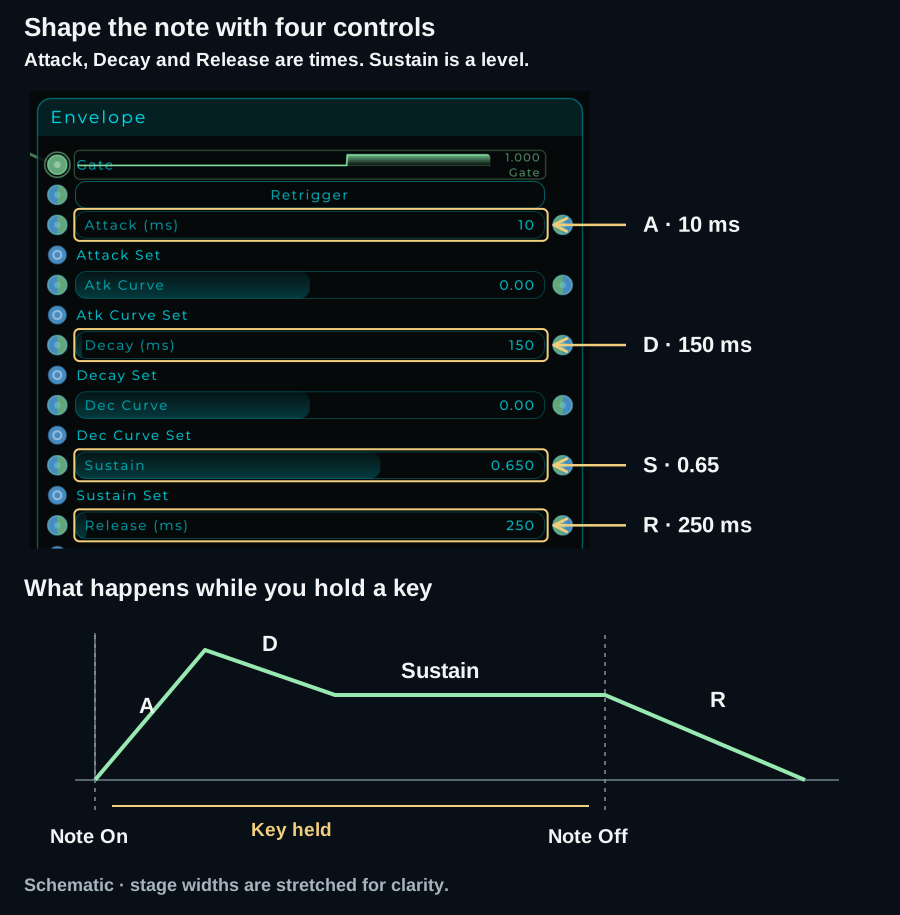
Hold a note long enough to hear the initial peak settle, then release it. Release starts from the current level, even if you let go during Attack or Decay.
Hear the difference
Both examples play the same 440 Hz note: press at 0.25 s, release at 1.50 s. Decay, Sustain and the second Volume's Gain remain unchanged.
Try those two changes in your patch. Attack softens the beginning; Release lets the sound continue after your finger lifts. Neither changes the note's pitch. Keep Hold Off on MIDI Keyboard for this exercise: Hold latches notes until triggered again, so simply releasing the mouse would no longer end the note.
If you hear nothing
Work along the path in order. The first missing result tells you where to look.
| What you notice | Check this |
|---|---|
| MIDI Monitor shows no notes | Connect MIDI Keyboard Out to the monitor's MIDI input. Set Freeze Off, Channel All and Notes On, then try an on-screen piano key |
| On-screen keys work, the controller does not | Check the standalone MIDI device or DAW track input, then the cable from MIDI In to the keyboard |
| The monitor sees notes, but the pitch is wrong | Connect Note Hz, not Pitch or Note Number, to Saw Frequency. MIDI note 69 should give 440 Hz |
| Notes arrive, but the synth stays silent | Check Gate → Envelope Gate, Envelope CV → Gain on the first Volume, Saw Enable On, and both Volume nodes' Unit Linear |
| It clicks briefly but will not hold | Use Gate, not Trigger NoteOn, for Envelope Gate. Check that Sustain is above 0 |
| It keeps sounding after release | Turn Hold Off, release all held notes, and allow the Release time to finish. Check that Saw reaches Audio Out through the first Volume, without a direct bypass cable |
| Gain on the first Volume will not change the level | Incoming CV controls it. Use Gain on the second Volume for the overall level |
| The wiring looks right but there is no output | Set Gain on the second Volume to 0.10, connect its Out to both output channels, and check your audio device or DAW track mute/monitoring |
Where to go next
The download is a single voice with a fixed playing level. Velocity and pitch bend are available from MIDI To CV, but are not wired into this patch. Receiving those messages alone does not make them affect the sound.
| You want to… | Next step |
|---|---|
| Play chords with independent envelopes | Follow Poly Modules; one MIDI To CV and one oscillator still make a single voice |
| Restart the envelope on each overlapping note | Also connect MIDI To CV Trigger NoteOn → Envelope Retrigger; keep the Gate connection |
| Change incoming notes | Put MIDI Transpose, MIDI Scale or MIDI Arpeggiator before MIDI To CV |
| Control a parameter with a hardware knob | Explore MIDI CC Extract and check the destination's expected range |
| Build a playable control surface | Add MIDI Keyboard and Envelope to the Front Panel |
See the MIDI node reference for I/O, filters, processors and generators, and Envelopes for more envelope controls.
Other MIDI messages
Notes are only part of MIDI. Velocity describes a note's playing strength; CC messages carry controller movements; pitch bend and aftertouch carry expressive changes. Clock carries timing, while SysEx carries device-specific data. Each needs an appropriate receiving node or an explicit control path; a MIDI cable is not an automatic mapping to every synth parameter.