
Appearance
Samplers
These nodes make sound by playing back audio you have already recorded, instead of building tones from scratch. The Sampler lays your sounds out across a keyboard, one zone per sample, and plays them as an instrument. The Audio Player loads a file and plays it back, with play, stop, loop and pitch controls. The Granular node turns a file into granular synthesis, chopping it into tiny overlapping snippets to create swirling, evolving textures. Both read the common audio formats (WAV, AIFF, FLAC and more) and let you change the pitch, the playback spot and how it plays, all on the fly.
Sampler
A sampler here is three nodes that work as one. The Sampler widget is the instrument: a keyboard with your sounds laid across it, each sound in a zone, and a full set of controls per zone. The Sample View widget shows the waveform of the zone you have selected and lets you drag its start, end, loop and fades. The Sampler Engine is the same playback engine without a face, for a patch that keeps its zones in a Sampler widget on the panel and wants the sound to come out somewhere else. Most patches only need the Sampler.

Building a map. Drag audio files (WAV, AIFF, FLAC, MP3 or OGG) onto the keys. Where you drop sets the root note, and how high on the strip you drop sets how many keys the zone spans: low on the strip for one key, higher for a wider spread. Several files dropped at once land side by side. Then shape the zones on the strip: drag a zone to move it, its left and right edges to change its key range, its top and bottom edges to set the velocity range that triggers it. Zones can overlap, so a soft and a hard sample can share the same keys. Lasso or Ctrl+click to select several and move them together, and right-click for delete, sort and distribute. Every edit is a step on the project's undo, so Ctrl+Z takes it back.
A zone's controls live in the Inspector while it is selected: root note and ranges, transpose and fine tune, volume, a gain in dB and pan, an ADSR envelope with a curve per stage, fades, sample start and end, a loop with crossfade or ping-pong, reverse, fixed velocity, and One Shot. With One Shot on, the zone plays through to its end whatever the key does: letting go changes nothing and the loop is not consulted, which is what a drum hit or a sound effect wants. Turn Link on and an edit applies to every zone at once; with Select by MIDI on, playing a note selects its zone. Right-click a zone and choose Normalize and its Gain is set so the loudest point of the played region reaches full scale: a number on the zone, undoable, and the file is never touched. On a zone that is part of a selection it does the whole selection. Reset Gain, next to it, puts the trim back to 0 dB. The Sample View shows the result, and its own right-click has the same two.
Saving a map on its own. Right-click the strip and choose Save Map... and the zones and their samples go into one .mnsmap file: a zip with the map inside and every sample beside it, so there is nothing to gather up. Move it, send it, give it away or sell it: Load Map..., or a drop of the file onto any Sampler, unpacks it into your Library under Sample Maps and brings the zones back, samples and all. Loading replaces the zones that were there, as one undo step, and a map opened a second time reuses what is already unpacked. A zone whose sample could not be found when the map was saved is still in it, silent, and the map says so.
The full list of the Sampler's parameters and pins is on the Widgets page, with the Sample View next to it.
Sampler Engine
The playback engine on its own, with no editor of its own. Connect a Sampler widget's Sample View output to the engine's Sample Map input and the engine plays that widget's zones; feed it notes at MIDI In and take the sound from Out L and Out R. Use it when the zones live on a front panel and the audio has to be made somewhere else in the graph.
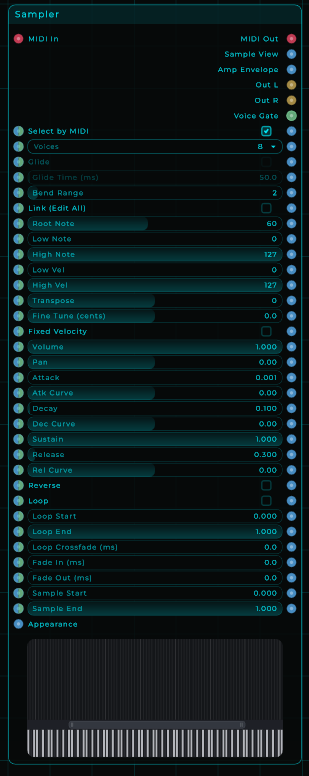
| Parameter | Range | Default | Description |
|---|---|---|---|
| Voices | 1 - 16 | (preset) | How many notes can sound at once. 1 is mono, and unlocks Glide |
| Glide | On/Off | Off | Slides the pitch from the previous note to the new one. Mono only |
| Glide Time (ms) | 1 - 5000 | (preset) | How long the slide takes |
| Bend Range | 0 - 48 semitones | (preset) | How far the pitch wheel bends |
Inputs: MIDI In (MIDI), Sample Map (Data, from a Sampler widget's Sample View output), Voices, Glide, Glide Time, Bend Range.
Outputs: View Out (Data, the engine's id, for a Sample View), Out L (Audio), Out R (Audio).
Audio Player
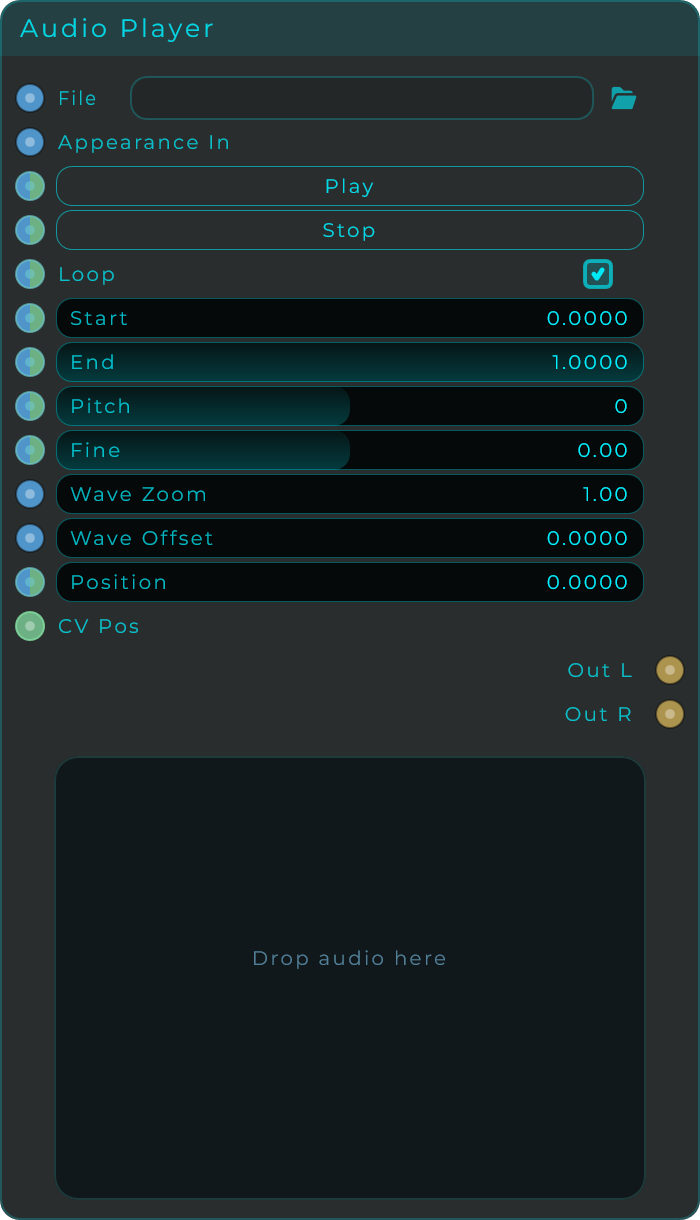
Loads an audio file from your computer and plays it back, with controls to set where it starts and stops, to loop it, to jump to any point, and to change its pitch. Use it for one-shot sounds, loops, backing tracks, or as a sound source to run into your effects.
| Parameter | Range | Default | Description |
|---|---|---|---|
| File | File picker | The audio file to play. You can also drag and drop a file onto the waveform | |
| Play | Event | Start playback | |
| Stop | Event | Stop playback and rewind to the Start point | |
| Loop | On/Off | On | Repeat playback within the Start/End region |
| Start | 0.0 - 1.0 | 0.0 | Playback start point (0 = beginning of file, 1 = end) |
| End | 0.0 - 1.0 | 1.0 | Playback end point |
| Pitch | -48 - +48 semitones | 0 | Transpose playback in semitones |
| Fine | -100 - +100 cents | 0 | Fine pitch adjustment in cents |
| Speed | 0.25 - 4 | 1 | How fast the file is read. 1 is as recorded |
| Stretch | On/Off | Off | Pulls pitch and speed apart |
| Volume | -60 - +12 dB | 0 dB | Output level, and the last of the controls. 0 is as recorded, -6 is half as loud, -60 is silence |
Speed and Stretch. On its own, Speed is a tape speed: run the file faster and it rises in pitch, exactly as Pitch slows it down when you transpose it down. That is one knob wearing two hats, and it is the right answer often enough to stay the default.
Turn Stretch on and the two come apart: Pitch becomes a real transpose with the timing left where it was, and Speed changes the timing without moving the pitch. It is the same stretcher the Clip Track warps clips with. Off by default, because it costs real work and a file at speed 1 with no transpose has nothing for it to do; leave it off and the player behaves exactly as it always has.
Inputs: Phase (scrub position 0..1, CV), Play, Stop, Loop, Start, End, Pitch, Fine, Speed, Stretch, Position (absolute seek 0..1), Volume, Appearance. When the Phase input is connected it takes full control of the read position and the transport, range, and pitch controls are disabled until you disconnect it. Connect an LFO or ramp to Phase for wavetable-style scanning through the sample.
Outputs: Out L (Audio), Out R (Audio), Phase (a CV ramp from 0 to 1 across the playback range, useful for syncing other nodes to the file).
Clip Track
One column of a session view: one clip playing at a time, audio or MIDI. Eight slots to begin with and up to thirty two. Put several side by side and you have the grid.
Every row shows what clicking it will do: a playing row draws a stop, a loaded row draws a play, and a queued one draws a hollow play that blinks while it waits for the bar.
Click a slot to launch it. It does not start there and then, it starts on the next Quantise boundary and blinks as queued until it does, which is what lets you change a part while everything else keeps running. Click the slot that is playing to stop it, on the same boundary. Launching a slot while another plays replaces it: one clip at a time is what a column does, and two at once is what a second track is for.
The strip along the top is the clock, and the track header. The two buttons at its right hand end are the ones that are not about any one row: arm, the circle, and stop, the square, which stops the track on the next boundary the same way clicking the playing row does. Bar and beat on the left, the pulse of the bar in the middle, and on the right what a launch is waiting for, counting down in beats while one is queued. The line underneath fills through the current Quantise period, so a clip that has not started yet is visibly on its way rather than apparently ignored. When nothing is rolling it says so: a stopped transport means a stopped launcher, and that is the answer to most of the questions this node raises.
Drop audio files or .mid files straight onto the rows. Several at once fill consecutive slots downwards.
| Parameter | Range | Default | Description |
|---|---|---|---|
| Slots | 1 to 32 | 8 | How many rows this track has |
| Arm | On/Off | Off | Record enable. Armed, every empty slot offers a record button |
| Play After Take | On/Off | On | Whether a finished take starts playing by itself |
| Take Length | 1 to 120 s | 30 s | The longest a recorded take may be. Inspector only |
| Slot | 1 to 32 | 1 | Which slot the settings below describe, and where Load Clip loads |
| Clip BPM | 0.0 to 999.9 | 120 | The tempo this audio was recorded at. Guessed when a file is dropped. A MIDI clip ignores it. The range is wide because this is really the question "how many beats is this file": a four bar loop treated as one bar, or a two second hit stretched across a phrase, both live off the ends of a musical range |
| Loop | On/Off | On | Whether this clip repeats or plays once and stops |
| Warp | Off / Repitch / Stretch | Stretch | How audio is brought to the project tempo |
| Transpose | -24 to +24 semitones | 0 | Move the clip. A real pitch shift under Stretch, a tape speed change otherwise |
| Reverse | On/Off | Off | Play this clip backwards |
| Grain | 5 to 200 ms | 43 ms | Stretch grain length. Only used by Warp Stretch |
| Quantise | Off, then the usual note values from 64 Bars down to 1/128 | 1 Bar | When a launch takes effect |
| Transport Source | Internal / Transport (DAW) / External Position | Internal | Which clock the launcher follows |
| BPM | 20 to 300 | 120 | Tempo when Transport Source is Internal |
| Gain | 0 to 4 | 1 | Output level of the audio side |
It works the way Live does. An audio clip carries the tempo it was recorded at, and it plays at the project tempo divided by that. Nothing asks how many bars it should last, because that is not a decision anybody makes: it is a fact about the file, and the length follows from it. The clip loops over its own length.
Clip BPM is guessed when a file lands, first from the file name, because loop packs write it there and OS_LFC_130_drum_loop.wav is telling you the answer. Failing that, from the length: the tempo that makes the clip a whole power-of-two number of bars, closest to the tempo your project is running at. It is a guess, and the control is right there for the times it lands on the wrong one.
Changing the speed while a clip is playing keeps it in time. The position in the file is worked out again from where the music is, rather than carried over from where the read had got to, so a clip you double mid-loop lands on the beat instead of drifting from it. That is what warping means: the timeline says where in the clip you are, and the clip's own tempo says where in the file that is.
Warp decides how audio is brought to the project tempo. Off plays the file as recorded, which is what a one-shot wants, and ignores Clip BPM entirely. Repitch resamples it, so it speeds up and rises in pitch, which is a tape machine and is often the sound people are after. Stretch does it with the pitch left where it was, and it is what every slot starts on: a loop dropped onto a row is expected to play at the tempo of the project it was dropped into, and Stretch is the only one of the three that does that without also moving its pitch. A MIDI clip needs none of this: it is already written in beats, so playing it at the project tempo is all there is to do.
The clock is the same one every timed node here uses. Quantise speaks the same list of note values as the Piano Roll and the Riff Generator, so a setting means the same thing wherever you read it. Transport Source picks where the timeline comes from: Transport (DAW) follows the project, Internal free-runs on its own BPM, and External Position takes a 0-upwards timeline in quarter notes from the Position input, which is how several of these lock to a clock you built yourself. Nothing plays in External Position until that input has actually sent something.
Right-click a row for what to do to the clip in it: launch or stop it, point the settings above at it, transpose it, reverse it, play it at double or half speed, give it a colour, or ask the file for its tempo again. Double and half speed are Clip BPM said the other way round, which is why a MIDI clip does not offer them. Everything in the menu is one of the per-slot settings, so the rows above and the menu never disagree.
Transpose steps in semitones rather than jumping to fixed intervals, because moving a part is something you do one semitone at a time with a listen in between.
Give a clip a colour and it owns its row: the light, the progress behind it and the queued blink all follow it. They are the same eight colours a node can be tinted with, so a red clip and a red node are the same red. Colour is what tells eight loops apart at a glance, which is the only reason a launcher colours anything.
Grain is how long a piece of the clip the stretcher works with. Longer holds low notes together, because a grain has to contain a couple of cycles of something before it can be lined up with anything, and smears transients, because everything inside one grain arrives at once. Shorter is the same sentence backwards. There is no value that is right for a kick and a hi-hat at the same time, which is why it belongs to the clip rather than to the track. It does nothing unless Warp is Stretch, and it adds no latency at any setting: the stretcher reads from where the clip has got to, it does not buffer ahead of it.
The launcher can go on the front panel, rows and clock and all, like the Piano Roll's editor. It is the part of this node you press while playing, and pressing it meant finding the node in the graph first.
A row is three places to click. The number on the left is a cell of its own, lit under the pointer and shaded while it is the chosen one, and it points the settings above at that slot; the i on the right opens the clip, and everything in between launches it. The i is on empty rows too, fainter: a slot's name, its colour and what pressing it again means belong to the slot rather than to the clip in it, and those are exactly what you want to set on a row you are about to record into. The number is also the value the Launch pin takes for that slot, which is what you need to know to build a scene.
Several rows at once. The number cell takes the three clicks every list takes: a plain click picks one row, ctrl (cmd on a Mac) adds one and takes it out again, shift takes everything from the last row picked to this one. Selected rows are outlined, and the settings above then write to all of them, as does the right-click menu, which says in its own items how many rows it is about. Select the eight, turn Warp once, and eight loops are stretching. Steps stay steps: Up a Semitone moves every selected clip from wherever it already is, so a selection keeps the intervals it was holding, while a settled value like Loop or Warp is the same for all of them.
The pins are deliberately not part of that. A cable into Clip BPM, Loop, Warp, Transpose, Reverse or Grain always writes to the one slot the Slot control names, whatever is selected in the editor. A selection is something a hand did while looking at the rack; a patch that wrote to a different number of slots depending on what happened to be selected would do something different every time it was opened.
On a front panel, Delete and Backspace empty the selected rows. It is what Clear Slot does in the menu, reached the way anybody reaches for it while they are playing: click the rack once so it has the keyboard, select the rows, press Delete. In the graph those keys still delete the node, which is what they mean there, and the rack in the graph never takes the keyboard at all.
Clip Info... opens the clip itself. Its waveform, or its notes drawn where they will actually sound, transpose included. How long the file is, what tempo it was recorded at, how long it lasts once warp and transpose have had their say, and its peak level. The same controls are there too, without the menu closing after every press, which is what makes stepping a transpose by ear practical.
Again is what pressing a clip that is already playing means, and it belongs to the clip because the answer is different per clip. It is in the right-click menu as well as in Clip Info: the menu is where you are already standing when you want to change it mid-performance. Stop ends the track, which is what a loop you are done with wants and what every clip did before this existed. Restart starts it again from the top, which is what a one-shot wants. Ignore does nothing at all, which is what a loop you are leaning on wants: no more stopping the groove by catching the wrong row. It obeys Quantise like any other launch, so a restart lands on the next boundary rather than the moment you pressed.
Transpose moves the clip in semitones. Under Stretch it is a real pitch shift with the timing left where it was. Under Off and Repitch there is no stretcher to hide behind, so it is a tape speed change, which is exactly what those modes are for; the clip then no longer fills the same number of beats, and the bar rather than the file owns the loop point. A MIDI clip simply gets its notes moved, and a note pushed off the keyboard is dropped rather than piled onto the edge.
Reverse plays the clip backwards. Audio is read from the other end, in any warp mode. A MIDI clip has its phrase mirrored, so a note that started at the beginning and lasted a beat now ends at the end and still lasts a beat: the phrase runs backwards while every note keeps its own shape.
Drag a clip from one row to another to move it. The two slots swap, settings and all, so nothing is ever destroyed by a drag and doing it twice puts everything back. A clip that is playing keeps playing from its new row.
Launching from outside is one pin. Launch takes a slot number, 0 stops, and the number of a row is written on the row. Anything that can produce a number can fire a clip: a MIDI note through a converter, a button on a front panel, a step in a sequencer, a value from the host. There is nothing else to set up.
Rows record as well as play. Wire something into In L and In R, or into MIDI In, then arm the track: the circle at the right of the clock strip, or Arm in the right-click menu, or the Arm control and its pin. Armed, every empty row offers a record button instead of offering to play nothing, and clicking one records into it. Record Into This Slot in the menu does the same for a row that already has something in it.
The take starts on the next Quantise boundary and closes on the one after whatever you press next, so it comes out a whole number of bars without anybody counting. It blinks red while it waits for the bar and fills in red while it captures. Pressing the same row again ends it, and the finished take starts playing straight away, in time, without waiting for another bar. Turn Play After Take off if you would rather it did not, which is what you want when the reason you stopped was to record the next one.
It lands twice: as a file in your Recordings folder, so it survives saving the project, and as a clip in the row, already playing. Its Clip BPM is the tempo the project was running at while you played it, which is not a guess like a dropped file gets: it is simply what happened.
Audio wins when both inputs are wired, because a clip is one or the other and audio is the one that cannot be reconstructed afterwards. Take Length in the inspector is the ceiling a take may reach; the room for it is made when a row is armed, so a rack of tracks that never record hold nothing at all.
The Record input does the same from a wire: a row number arms that row, 0 stops, and a bare event arms whichever row the Slot control is pointing at.
An empty Clip Track is a column of scenes. Rows can be launched whether or not there is a clip in them, so a track with nothing loaded is a stack of scene buttons. Wire its Scene output into every other track's Launch and one click fires the whole row, on the same boundary, because they are all watching the same clock.
Scene carries the row from the moment it is asked for, not from when it starts. That is the difference between a scene that works and one that lands a bar late: every track queues on the same click and they all arrive together. Name the rows and you have the scene list, with the names on it.
A Data Send and Data Receive pair keeps that tidy in a big rack: name the wire Scene, feed one Data Send from the scene track, and put a Data Receive next to every track's Launch. No cable crosses the patch, and adding a track is reading the same name once more.
Rename a row with Rename... in the right-click menu. A row with no name of its own is called after the file in it, which is right until the file is called OS_LFC_130_drum_loop_zest and the row means Chorus. Clearing the name gives the file its name back.
Copy a clip by holding Alt while you drag it onto another row, or with Copy Clip and Paste Clip in the right-click menu. The pointer says which it is going to be, a move or a copy, and the row it would land on shows a plus while it is a copy: without that, the two look identical the whole way to the release and the only way to find out which one you did is to go back and look at the row you came from. A move dims the row it came from, and a copy does not, since that row is staying where it is. A copy shares the audio rather than loading it again, so the same file on four rows at four different speeds costs what one costs.
The drag does not stop at the edge of the node. Carry a clip onto another Clip Track anywhere on screen, another node on the canvas or the rack next to it on a front panel, and it lands there: a plain drag moves it, Alt copies it, and the row it would land on lights up on that rack exactly as it does here. Between two tracks it is a move rather than a swap, because a swap would reach into the rack the clip came from and change a second row there that nobody was pointing at. This is how a grid gets built: a line of Clip Tracks on a panel, and clips dragged between them.
External Position takes the whole timeline, tempo included: the tempo is measured from how fast the position moves, so wiring one Position into a rack of these makes them run at the same speed as well as land on the same bar. That is how several Clip Tracks are linked to a clock you built yourself. The input takes a CV stream or a plain value.
If that position stops moving, so does everything here. A slave that carries on without its master is not synchronised to anything. The clock strip says stopped while it waits, so a Position input that is not arriving looks like what it is instead of like a broken node.
The body has an Appearance section in the inspector: body background, row, playing, text, frame and clock colours, plus a switch for the clock strip. All of them start unset and follow the theme, and the Appearance input accepts the same names as a JSON object so a patch can restyle the face while it runs.
Inputs: In L, In R and MIDI In (what a take is recorded from), Launch Slot (slot number, 0 stops), Stop Track, Record Slot (slot to record into, 0 ends the take), Arm, Play After Take, Load Clip, Clear Clip, Position (a 0-upwards timeline in quarter notes, read when Transport Source is External Position), Appearance (JSON), and every parameter above on its own hybrid pin, so any of them can be a wire Outputs: Out L, Out R, MIDI, and four CVs: Playing, Playing Slot (counting from 1, or 0 for none), Phase (0 to 1 through the clip) and Scene Slot (the slot last asked for, from the moment it is asked for)
Granular
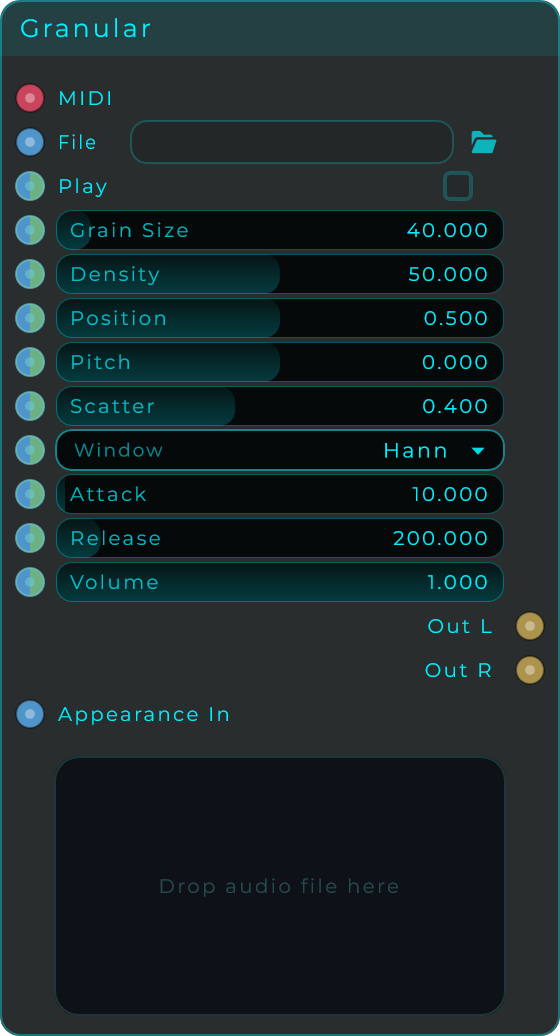
A granular instrument and processor that can play many notes at once. It loads an audio file and replays it as a cloud of tiny overlapping snippets called grains. By controlling those grains you can stretch a sound out, smear it, and reshape it into evolving textures, pads and glitchy effects. Play it with MIDI to use it as a pitched instrument, or flip the Play toggle to let it run on its own. The grain window is fully shapeable with Shape, Skew and Flat, all modulatable; older projects load unchanged, with their previous window type mapped to the closest Shape.
| Parameter | Range | Default | Description |
|---|---|---|---|
| File | File picker | The audio file to granulate. You can also drag and drop a file onto the body | |
| Play | On/Off | Off | Start/stop free-running playback. Disabled while a MIDI source is connected |
| Grain Size | 1 - 2000 ms | 40 ms | Length of each individual grain |
| Density | 0.1 - 200 | 50 | Number of grains generated per second |
| Position | 0.0 - 1.0 | 0.5 | Read position in the file (0 = start, 1 = end). Also reported on the Position output as you drag it on the body |
| Pitch | -24 - +24 semitones | 0 | Pitch shift applied to the grains |
| Scatter | 0.0 - 1.0 | 0.4 | Random spread of grain start positions around Position |
| Shape | 0.0 - 1.0 | 0.5 | Grain window shape, swept smoothly from a linear ramp (0) through a raised cosine (0.5) to a flat top (1) |
| Skew | -1.0 - 1.0 | 0.0 | Leans the window's peak toward the start (negative) or the end (positive) of the grain |
| Flat | 0.0 - 1.0 | 0.0 | Widens the flat sustain in the middle of the window |
| Attack | 0 - 500 ms | 10 ms | Amplitude envelope attack time |
| Release | 0 - 2000 ms | 200 ms | Amplitude envelope release time |
| Volume | 0.0 - 1.0 | 1.0 | Output volume |
Inputs: MIDI (each note triggers grains at the set pitch; while connected, the Play toggle is disabled), File (load a file path dynamically), Appearance, plus a Data/CV input for every parameter above so you can modulate them. Try connecting an LFO to the Position input to slowly scan through a sample.
Outputs: Out L (Audio), Out R (Audio), Position (Data, reports the read position as you drag it on the body).