
Appearance
Rack Canvas
A Rack Canvas is a surface where you build a modular synth or effect out of modules, the way you would in a hardware rack or in VCV Rack. You put modules on it, arrange them freely, patch them together with cables, and play them. It lives in your graph and on your Front Panel, and the people who play your project in Perform can use it too.
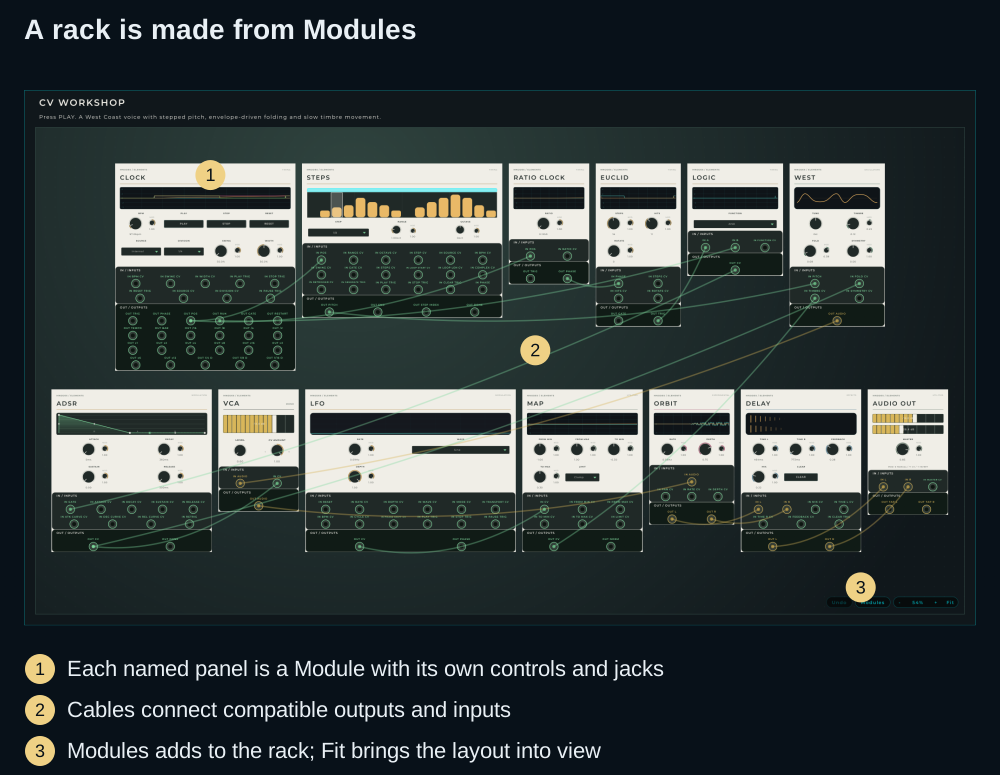
CV Workshop is an example rack from MNodes Elements. Each named panel is a Module; the cables join its jacks.
Three things to know
- Only Rack Modules go on a rack. A Rack Module is a Module marked as made for a rack. See Rack Modules.
- What is on a rack is saved inside your project. Every module on it, where it sits, its cables and its settings are part of the project and of its presets, so the placed rack can be restored without reinserting each Module. External resources and hosted plugins still need to be available.
- A shared project installs the modules it needs. Your own modules travel inside the exported file, and MNodes can obtain referenced Hub or Factory content during import when it is available and the download succeeds. See Sharing a project with a Rack Canvas.
Quick reference
| To | Do this |
|---|---|
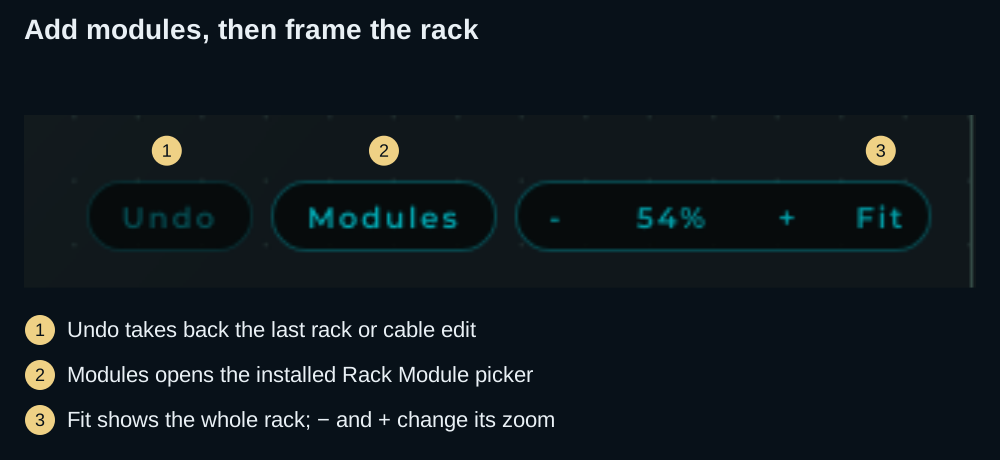
| Add a module | Press Modules in the rack's corner, then double-click a card or drag it onto the rack |
| Add a module where you click | Right-click the empty surface and choose Add Module... |
| Move a module | Drag its panel, or any part of it that is not a control. Hold Alt to drag it from anywhere |
| Remove a module | Press Delete with the mouse over it, or right-click its panel and choose Remove |
| Duplicate a module | Right-click its panel and choose Duplicate |
| Patch | Drag from an output jack to an input jack |
| Move or remove a cable | Drag it out of the input jack it is plugged into, then let go on another input, or away from the jacks to remove it |
| Scroll | Mouse wheel (Shift + wheel to go sideways), the scroll bars, or drag the empty surface. From anywhere, over modules too: drag with the middle button, or hold Space and drag |
| Zoom | Ctrl + wheel (Cmd on Mac), a pinch, or the zoom control in the corner |
| See every module at once | Double-click the empty surface, or press Fit in the corner |
| Undo | Ctrl+Z (Cmd+Z on Mac). In Perform, the Undo button beside Modules |
Your first rack
- Install a pack of Rack Modules, or mark one of your saved Modules as rack-ready.
- Add Rack Canvas to the graph. Right-click its header → Add to Front Panel if you want to play it on the main surface.
- Press Modules inside the rack and double-click a card. Add a second compatible module the same way.
- Move them by dragging blank panel space. Drag an output jack → input jack of the same type to connect them.
- Arrange an audio route to Audio Out, either inside an output module or through jacks connected to the rest of your graph. Placing two modules beside each other does not connect their sound.
- Press Fit to see the rack, then Save the project.
If the Modules browser is empty, check that the library contains Modules marked Rack Module. A plain graph node cannot be dropped onto the rack as a module.
Adding a Rack Canvas to your project
- Open the Node Browser and find Rack Canvas under the Subgraph category.
- Drag it onto the graph, or double-click it. The node shows the rack's surface straight away, so you can already work on it in the graph.
- To have it on your Front Panel, right-click the node and choose Add to Front Panel. It works the same there, and you can make it as big as you like.
The Show Panel input opens the rack in a window of its own, which is handy on a second screen.
A Rack Canvas is used from the outside. Unlike a Module, it does not open: there is no graph to step into, and everything happens on its surface.
Rack Modules
A rack takes Rack Modules only: Modules marked as made for a rack, usually ones with jacks on their panel to patch them with. Nothing is a Rack Module until it is marked. The mark is saved inside the Module's own file, so it stays with the Module in a pack, in an export and on the Hub.
To mark a Module, right-click it in the Modules explorer and choose Add to Rack Modules, or right-click a pack's header to mark every Module in it. Racks, at the top of the Modules explorer, lists all your Rack Modules. Every way to mark them is in Rack Modules, in the Modules guide.
If you drag a Module that is not a Rack Module onto a rack, the rack tells you so and does not take it.
Putting modules on the rack
Press Modules in the rack's corner. Add a module opens over the rack with a card for each Rack Module installed on your computer: the picture of its panel with its name under it.
- Double-click a card to put that module on the rack, in the free space nearest the middle of the view. The browser closes.
- Drag a card to the place on the rack where the module should go. The browser steps aside while you drag.
- Type to search by name, category, pack, author or description. Every word you type has to match.
- Pick a card with the arrow keys and press Return to add it. With nothing picked, Return adds the first card.
- Right-click the empty surface of the rack and choose Add Module... to open the browser and put the module you pick where you clicked.
- Close the browser with Escape, its close button, or a click anywhere outside it.
Hover a card to read its description. All installed, Project and Missing are the choices of the list at the top of the browser, and the rest narrow whichever is chosen:
| Control | What it does |
|---|---|
| All installed | Shows every Rack Module installed on this computer |
| Project | Shows the Rack Modules this project uses (see The Project list) |
| Missing | Shows the modules this project needs that this computer does not have. Only there while some are missing |
| Category chips | Show one category. The categories are a few broad ones, the same as in the Modules explorer, and they narrow All installed, Project and Missing alike |
| Collection | Shows one collection, with its cover when it has one |
| Size slider | Makes the cards bigger or smaller |
| Get All | Installs every missing module that can be installed. Shown on Project and Missing when two or more can be |
A module lands in the nearest space that is free, snapped to the rack's grid, so two modules never sit on top of each other.
Working with modules on the rack
Move a module by dragging any part of it that is not a control: its panel, and the captions, pictures and shapes on it. The cursor turns into a hand wherever that works. Hold Alt and drag to move a module from anywhere, its controls included. Carry a module, or a card from the browser, to the edge of the rack and the view scrolls to follow it.
Remove a module by pressing Delete (or Backspace) with the mouse over it, or right-click its panel and choose Remove.
Duplicate a module by right-clicking its panel and choosing Duplicate. The copy has the same settings as the original and appears next to it.
Undo works as everywhere else in MNodes: adding, moving or removing a module and plugging, moving or pulling out a cable are each one step.
Patching
Patch the modules together with the jacks on their panels, the same way as with the Jack In and Jack Out sockets of the Front Panel. Every detail is in Patch Cables; in short:
- Drag from an output jack to an input jack to connect them. Only jacks of the same type (Audio, CV, MIDI or Data) can be joined. An output can feed as many cables as you like.
- An input takes one cable. Let a new cable go on an input that already has one, and the new cable takes its place.
- Drag from an input that has a cable to take that cable with you. Let go on another input to move it there, away from the jacks to remove it, or back on the same input to leave it as it was.
- Right-click a jack and choose Disconnect Cable to remove its cables.
To feed one input from several outputs, put a mixer module in between, as you would on a hardware rack.
The cables themselves do not react to the mouse, so a cable lying across a module never gets in the way of its knobs. They are drawn faint, so the modules under them stay easy to read, and the cables of the jack under the mouse are drawn solid, so you can see where they go. See Seeing the cables.
A rack's jacks take cables at any time: on its node in the graph, and on the Front Panel even while the panel is unlocked (see On the Front Panel).
A cable can also run between a module on the rack and a jack outside it, in the graph or on the Front Panel. That is how the rack's sound and signals reach the rest of your patch. A module that sends its sound out by itself, such as an audio output module, works on the rack exactly as it does anywhere else.
Cables are drawn only as far as the rack shows them: scroll a module out of view and its cables go out of view with it, and a cable coming from outside the rack meets the rack's edge.
Looking around
- Scroll with the mouse wheel, and hold Shift to scroll sideways. On a rack the wheel always scrolls, even with the pointer over a module's knobs and sliders: to turn those, drag them.
- Drag the empty surface to scroll in any direction.
- Drag with the middle button, or hold Space and drag, to scroll from anywhere on the rack, on top of a module and its knobs too: nothing under the pointer moves or turns. Over a rack this gesture moves the rack and not the graph or the Front Panel around it; to move those, start the drag outside the rack.
- Scroll bars appear along the right and bottom edges while some modules are out of view. Drag them to move around.
- Zoom with Ctrl + wheel (Cmd on Mac) or a pinch on a trackpad, from 25% to 200%. The zoom control in the corner has - and +, the current size (click it to go back to 100%) and Fit.
- Double-click the empty surface, or press Fit, to see every module at once. The right-click menu of the surface also has Show All Modules and Actual Size.
The surface starts at its top left corner and grows to the right and down as far as your modules go. Where you left the view, its zoom and its scroll, is saved with your project.
On the Front Panel
A Rack Canvas on the Front Panel works the same while you edit the panel, not only when the panel is locked: you can add, move, remove, play and patch its modules. To select, move or resize the rack itself, use the thin band along its edges, which lights up when the mouse is on it. Right-click that band for the rack's menu as a panel widget.
A cable started on a rack's jack can go into any jack on the panel, outside the rack too. The panel's own jacks, the ones outside any rack, take cables only while the panel is locked, since a click on one of them while you lay the panel out selects it (see Where you can patch).
The rack's look
Everything about the rack's look is in the Appearance section of the Inspector:
- Background: a solid colour, or a linear or radial gradient, set up the same way as a widget's background. The gradient covers the rack and stays put while you scroll.
- Background Image: a picture or a texture. Tile repeats it across the surface, so it moves and zooms with the modules like the rails of a real rack. Fill, Fit and Stretch keep it still behind the modules.
- Grid: the dots modules snap to, shown always, only while a module is being moved, or never, in the colour you choose. When you zoom out, the grid shows fewer dots instead of disappearing.
- Border: a frame around the rack, with its own width and colour.
- Scroll Bars: shown while some modules are out of view, or never.
The rack shown at the top of this guide uses a rail background. Its background and the artwork on each Module are separate: changing the rack background does not redesign the modules.
Every setting is in Parameters, at the end of this page.
In Perform
When your project is played in Perform, you decide, rack by rack, what the player may change. Three switches in the rack's Inspector decide it, and all three are on to begin with:
| Switch | What it lets the player do in Perform |
|---|---|
| Add in Perform | Use the Modules button, Add Module... and Duplicate |
| Move in Perform | Move modules around the rack |
| Remove in Perform | Take modules off with Delete and Remove |
Playing the modules, patching cables and looking around always work in Perform, whatever the switches say. With Move in Perform off, dragging a module scrolls the rack instead. With all three off, the rack is a fixed instrument that can still be played and repatched.
In Perform, the module browser shows every Rack Module installed on the player's computer, the same as while you build.
Perform has no Undo of its own, so a rack that can be changed there shows an Undo button beside Modules. It takes back the last module added, moved or removed, or the last cable plugged in, moved or pulled out. Ctrl+Z (Cmd+Z on Mac) with the mouse over the rack does the same.
To keep the changes, choose Save in the menu under the MNodes logo, or press Ctrl+S (Cmd+S on Mac).
Try it: disable Move in Perform, switch to Perform and drag a blank part of a module. The view scrolls while the module stays in place. Its knobs and patch cables still work.
Presets and States
A States node or a Preset Manager preset keeps the whole rack: the modules on it, where they sit, the cables between their jacks and the values of their controls. The modules are stored inside the preset itself, so a preset brings them back even on a computer that does not have them installed.
Recalling a state or loading a preset puts the rack back as it was and changes only what differs: a module that is still on the rack stays as it is, one that was taken off comes back, and one added since goes away. Morphing between states only moves values. When modules come back or go this way, Undo starts over, as it does when you open a project.
Sharing a project with a Rack Canvas
Read this before you send a project with a rack to someone, or publish it on the Hub.
What travels inside your project
Every module on a rack is saved whole inside your project: its inner patch, its panel, its settings and its cables. The same goes for the modules kept in your presets and States. Opening the project restores those placed modules. Samples, artwork and hosted plugins are separate dependencies: collect supported files before sharing, and make sure the required external plugins are installed on the receiving system.
The only thing that needs a module to be installed is adding another one from the browser. Duplicate does not: it copies the module that is already on the rack.
The Project list
Project, in the list at the top of the browser, shows the Rack Modules your project depends on:
- every module on its racks, and
- the modules and packs you add by hand: right-click a card and choose Add to Project, or Add Pack to Project for its whole pack. Remove from Project takes one out again.
Add by hand the modules you want the people who play your project to have even though they are not on a rack yet, for example a set of modules you expect them to add in Perform. The Project list tells MNodes which reusable library modules to include or obtain during import, according to their origin.
For each of these modules the project keeps a link (its name, its author and its pack), not a copy of the module. The one exception is your own modules when you export, which travel inside the file (see below).
Placed modules and the Project list serve different purposes. The project stores the modules already on the rack. The list also records reusable library modules the player may want to add later.
Where each module comes from
What happens on the other computer depends on where the module came from on yours:
| Where the module comes from | What happens when someone imports your project |
|---|---|
| Your own modules: the ones in your Modules library that you made, or installed from a pack file | They travel inside the .mnprtz when you use Collect All & Export, and are installed when it is imported |
| MNodes factory content, such as the modules of MNodes Elements | MNodes requests the required Factory content during import; installation needs it to be available and the license/download checks to succeed |
| The MNodes Hub | MNodes requests them from Hub during import; unavailable content or a failed download remains missing |
| A Hub module that is no longer on the Hub | It cannot be installed, and its card says so |
An imported module never replaces a module or a pack of the same name that is already on that computer.
Before you share: a checklist
- Mark the modules you use as Rack Modules (see Rack Modules).
- Add to Project every module you want players to have that is not on a rack yet.
- Save your project. Collect All & Export writes the project as you last saved it, so changes you have not saved are left out.
- Choose File > Collect All & Export.... It writes one
.mnprtzfile with your project, its samples and images, and your own Rack Modules. - Send that file, or upload it to the MNodesHub.
What the person who imports it sees
When they import your .mnprtz with File > Import Presets..., or install your project from the Hub:
- Your own modules are installed into their Modules library.
- MNodes attempts to obtain referenced Hub and Factory modules. The status shows whether those library dependencies have installed.
- Opening the project restores its embedded rack layout and graphs. Missing library modules can prevent adding new instances from the browser; missing samples or external plugins can also affect playback.
If a module could not be installed, for example because there is no internet connection, the rack shows how many are missing in its corner, beside Modules: for example 2 missing. Pressing it opens the browser on Missing:
- Get downloads that module from the Hub. Its card shows how far the download has got, and turns into the module once it is in. Waiting means another download goes first.
- Install installs MNodes' factory content, for a factory module.
- Retry tries again after a download failed. Hover the card to read what went wrong.
- Get All gets every missing module that can be had, one after another.
- A module with no button cannot be installed from MNodes. Hover its card to see who made it and where it came from.
If a download fails: keep the project open, restore the connection and use Retry or Get All. For an entry with no available install action, use its description to identify the missing content and obtain it from its author.
Troubleshooting
A module is not in the browser. Either it is not marked as a Rack Module, or it is not installed on this computer. Mark it in the Modules explorer (see Rack Modules).
The rack says "Only Rack Modules go in a rack". The Module you dragged is not marked. Right-click it in the Modules explorer and choose Add to Rack Modules.
The wheel does not turn a knob. On a rack the wheel scrolls the rack. Drag the knob instead.
I cannot pick up a cable by its middle. That is on purpose: a cable is handled by its jacks, so it never gets in the way of the knobs it lies across. Drag it out of the input it is plugged into.
A cable took the place of another one. An input takes one cable, so a new cable let go on a busy input replaces the one it had. Undo brings the old one back. To feed an input from several outputs, use a mixer module.
The Rack Canvas does not open when I double-click it. That is on purpose: a Rack Canvas is used from its surface. Connect it to the rest of your patch with cables.
There is no Modules button. The rack is too small to show it, so make it bigger. In Perform, the rack's author may also have turned Add in Perform off.
A module says it came from the Hub, but it has no Get button. The Hub does not have it anymore. Ask the author of the project for it.
I exported my project and a module I added is not in it. Collect All & Export writes the project as you last saved it. Save, then export again.
Parameters
| Parameter | Range | Default | Description |
|---|---|---|---|
| Grid | Off / 5 px / 10 px / 20 px / 40 px | 10 px | The step modules snap to as you place and move them |
| Add in Perform | On / Off | On | Whether modules can be put on the rack in Perform |
| Move in Perform | On / Off | On | Whether the rack's modules can be moved in Perform |
| Remove in Perform | On / Off | On | Whether modules can be taken off the rack in Perform |
| Visible | On / Off | On | Shows or hides the rack on the Front Panel without removing it from the layout |
| Panel Alpha | 0.0 - 1.0 | 1.0 | How solid the rack's surface is behind its modules, colour and image together |
| Background Mode | Solid / Linear / Radial | Solid | One colour, or a gradient along a line or out from a point, over the whole rack |
| Background Colour | Colour | Black | The colour of the surface in Solid mode, and where an unset gradient starts from. A transparent background image is tinted by it |
| Background From / To | Colour | Unset | The gradient's two colours. Unset, From is the Background Colour and To is that colour a little brighter |
| Background Angle | 0 - 360 | 0 | The gradient's direction: 0 runs left to right, 90 top to bottom |
| Background Start / End | 0 - 100 | 0 / 100 | Linear only: where along its line the gradient starts and ends |
| Background Centre X / Y | 0 - 100 | 50 | Radial only: where the gradient starts from, across and down the rack |
| Background Radius | 0 - 100 | 100 | Radial only: how far the gradient reaches |
| Background Image | PNG, JPEG or SVG | None | A picture or a texture for the surface. Collect All & Export takes it with the project |
| Image Fit | Fill / Fit / Stretch / Tile | Fill | Fill covers the rack, cropping the image; Fit shows all of it; Stretch pulls it to the rack's shape; Tile repeats it at its own size across the surface, moving and zooming with the modules |
| Image Opacity | 0.0 - 1.0 | 1.0 | How strong the image is over the background colour |
| Show Grid | While Moving / Always / Never | While Moving | When the grid's dots are drawn. Modules snap to the Grid step either way |
| Grid Colour | Colour | Theme | The colour of the grid's dots |
| Border Width | 0 - 20 | 0 | How thick the border around the rack is, in pixels. 0 draws none |
| Border Colour | Colour | Theme | The colour of the border |
| Scroll Bars | On / Off | On | Shows scroll bars while some modules are out of view |
Inputs: Bypass, Show Panel and Appearance.
Outputs: none. Sound and signals leave through the cables patched to its modules.