
Appearance
Patch Cables
Patch cables join jacks: the round sockets on your Front Panel, on the panels of your modules and on a Rack Canvas. You plug them in, move them and pull them out by hand while the sound keeps playing, the way you would on a hardware modular.
A patch cable makes a real graph connection between two jacks. The graph and the panel show the same connection, and the project saves it with the rest of the patch.
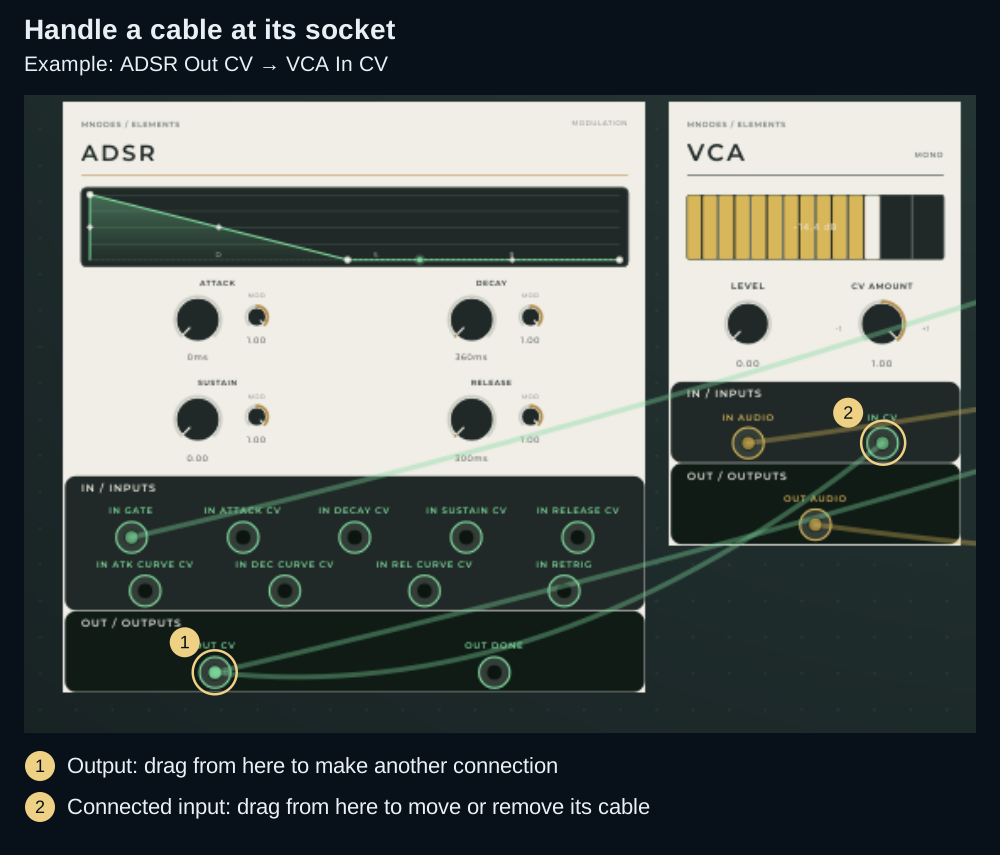
This Rack Canvas example uses the same output-to-input cable gesture as ordinary panel jacks.
Three things to know
- You handle a cable by its jacks, never by its middle. The cable itself does not react to the mouse, so it never gets in the way of the knobs it lies across.
- An output feeds as many cables as you like. An input takes one. Plug a new cable into an input that already has one, and the new cable takes its place.
- Cables are drawn faint until you point at a jack, so the controls under them stay easy to read.
Quick reference
| To | Do this |
|---|---|
| Plug in a cable | Drag from a Jack Out to a Jack In. You can also start from an empty Jack In and drag to a Jack Out |
| Send one output to several inputs | Drag from the same Jack Out once for each input |
| Replace the cable in an input | Let the new cable go on that input |
| Move a cable to another input | Drag from the input it is plugged into, and let go on the other input |
| Pull out a cable | Drag it out of its input, and let go away from the jacks |
| Pull out every cable of a jack | Right-click the jack and choose Disconnect Cable |
| Change your mind in the middle of a drag | Let go where you started |
| See where the cables of a jack go | Point at the jack |
| Undo a change to the cables | Ctrl+Z (Cmd+Z on Mac) |
On the Front Panel, the panel's own jacks take cables while the panel is locked, and the jacks on a Rack Canvas at any time. See Where you can patch.
Jacks
Two nodes make the jacks. Both are in the Widgets category of the Node Browser:
| Node | On the panel | In the graph |
|---|---|---|
| Jack Out | A cable leaves from it | Wire into its In pin what the jack should offer |
| Jack In | A cable arrives at it | Wire its Out pin to what should receive the signal |
Think of a jack as a hole through the panel. The signal goes from your patch into a Jack Out, along the cable, out of a Jack In and back into your patch.
Build a pair of jacks
Use a patch with an LFO already controlling a compatible CV/hybrid parameter. Insert the jacks into that known working route:
- Add Jack Out and Jack In, and set Type = CV on both.
- Connect the LFO output to Jack Out — In. Connect Jack In — Out to the destination that the LFO previously controlled.
- Right-click each jack's header → Add to Front Panel and arrange them on the unlocked panel.
- Lock the panel, then drag the output socket to the input socket. The modulation route is complete again.
- Drag the cable from its input socket and release it over empty space to unplug it. Use Undo to reconnect it.
A jack passes the signal through; it does not scale it. If you use an LFO to move Filter's frequency, map its range to suitable Hz values before the jack. A raw 0–1 signal is not a 20–20000 Hz sweep.
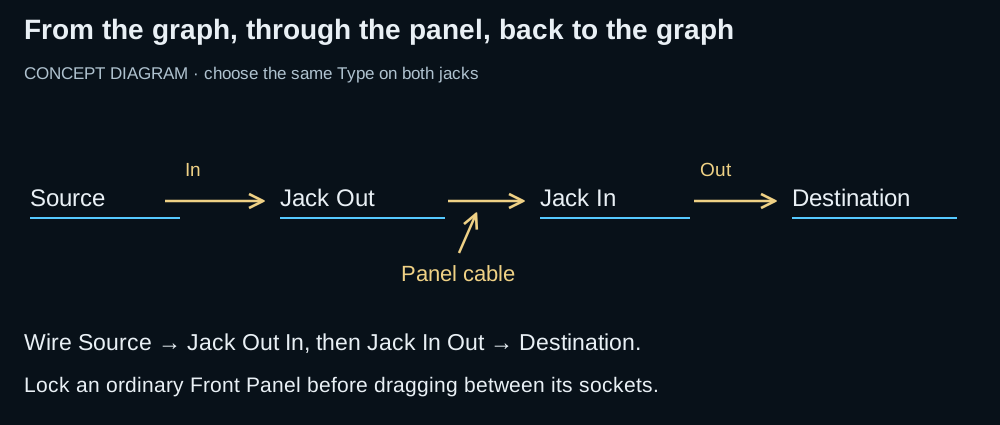
Concept diagram: In and Out on the graph describe the signal entering or leaving each jack node. On the panel, a cable leaves Jack Out and arrives at Jack In.
To put a jack on the Front Panel, right-click its node header and choose Add to Front Panel, the same as any widget. Rack Modules usually come with their jacks already on their panels.
What a jack carries
Every jack has a Type: Audio, CV, MIDI or Data. You set it on the node or in the Inspector.
- A cable only joins two jacks of the same type, so audio never ends up in a MIDI input by accident.
- When you change the Type of a jack, the cables that no longer fit are pulled out.
- The rules of the graph still apply. A cable is refused wherever a wire would be, for example when it would make a feedback loop.
Normalled CV inputs
A Jack In set to CV can be normalled, like the inputs of many hardware modules. Turn on Normalled CV in the Inspector, and while nothing is plugged into the jack, it sends the Normal value instead of silence. Plug a cable in and the cable takes over. Pull it out and the Normal value is back.
While Normalled CV is on, Normal is also a pin on the node, so your patch can set it, for example from a knob.
Colours and look
A cable takes its colour from the Jack Out it leaves. In the Appearance section of the Inspector, every jack has a cable colour for each type: Cable Colour Audio, Cable Colour CV, Cable Colour MIDI and Cable Colour Data. All four start unset, which means the theme's colour for that kind of wire, so a CV cable is the same colour as a CV wire in the graph. To colour your cables, set them on the Jack Outs: on a Jack In they only colour a cable while you drag it out from there.
The ring around the hole wears the theme's colour for the jack's type until you set Ring Colour yourself. The body, the ring, the hole and its size can all be changed, the hole can show a picture of your own, and the caption can say anything or nothing. Every setting is in the Jack In and Jack Out reference.
Plugging cables in
Drag from a Jack Out and let go on a Jack In. The cable is plugged in the moment you let go.
- While you drag, the end of the cable jumps into the jack under the mouse when that jack can take it. If it does not jump in, letting go there does nothing: the jack is of another type, the two jacks are already joined, or the graph refuses the connection, for example because it would make a feedback loop.
- An output feeds as many cables as you like. Drag from the same Jack Out again for each one.
- You can also start from an empty Jack In and drag to a Jack Out.
- Letting go away from the jacks, or back on the jack you started from, plugs nothing in.
An input takes one cable
Each input holds one cable, as on a hardware modular. Let a new cable go on an input that already has one, and the new cable takes its place: the old one is pulled out, in the same step.
While you drag over a busy input, its cable is drawn solid, so you can see which cable letting go there would replace.
To feed one input from several outputs, mix them before the jack: a mixer module on a rack, or in your patch a Sig Add for audio or a MIDI Merge for MIDI.
Projects from before MNodes 1.1.3
Before 1.1.3 an input could hold several cables. A project saved like that keeps them all. Dragging from such an input takes the cable drawn on top, and a new cable let go on it replaces all of them.
Moving and removing cables
A cable is always handled by its jacks:
- To move a cable, drag from the input it is plugged into. The cable comes with the mouse while its other end stays in its output. Let go on another input and the cable is plugged in there.
- To pull a cable out, drag it out of its input the same way and let go anywhere away from the jacks.
- To leave it as it was, let go back on the same input. Nothing changes, and nothing goes into the undo history.
- Let go on a jack that will not take it, and the cable goes back where it was.
- To pull out every cable of a jack at once, right-click the jack and choose Disconnect Cable. On a jack with several cables, such as an output feeding three inputs, the menu says how many: Disconnect 3 Cables.
The middle of a cable does not react to the mouse at all. A press on a cable goes to whatever is under it, so the knobs and sliders a cable lies across keep working.
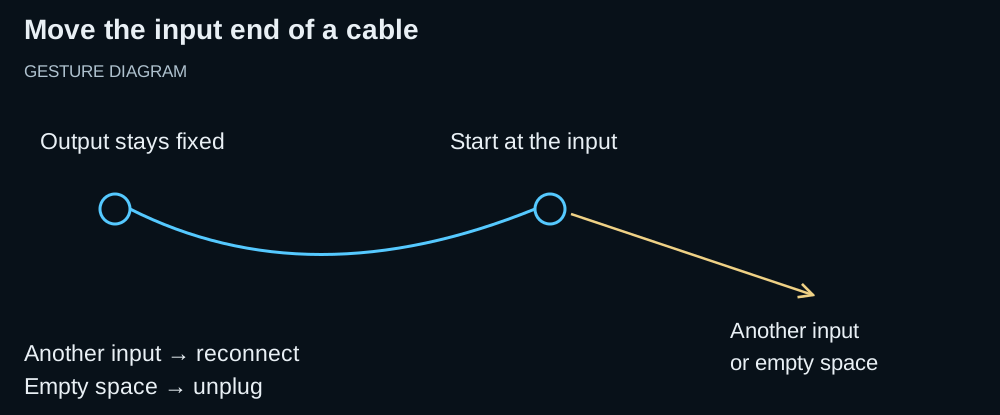
Gesture diagram: start at the connected input. Release on another compatible input to move the connection, or on empty space to remove it.
Undo
Every change to the cables is one step of Undo (Ctrl+Z, Cmd+Z on Mac):
- plugging a cable in, or pulling one out,
- moving a cable to another input,
- a new cable taking the place of an old one: one Undo brings the old cable back,
- Disconnect on a jack with several cables: one Undo plugs them all back in.
Perform has no Undo of its own. There, the Undo button of a Rack Canvas takes back the last module or cable change.
Seeing the cables
Cables are drawn faint, so the controls under them stay easy to read. They are drawn solid when they belong to:
- the jack under the mouse, so pointing at a jack shows at a glance where its cables go,
- the jack you started a drag from,
- the jack a dragged cable is over, which shows what letting go there would replace.
The cable you are dragging is always drawn, and turns fully solid when it is over a jack that can take it. A small plug at each end shows where a cable is plugged in.
Try it on the example above: point at a connected socket and follow the highlighted cable to its other end. Move back to a knob; the cable becomes faint and the knob remains operable beneath it.
Where you can patch
| Where | When you can plug cables |
|---|---|
| Front Panel | While the panel is locked (the padlock in its toolbar), and always in Perform |
| A module's panel | The same as the Front Panel |
| Rack Canvas | At any time: on its node in the graph, and on the Front Panel even while the panel is unlocked |
| Graph | At any time |
While the Front Panel is unlocked, you are laying it out: a click on one of its jacks selects it and a drag moves it, like any other widget. Lock the panel to plug cables into those jacks, or patch in the graph.
The jacks on a Rack Canvas are the exception. The rack itself is selected, moved and resized by the band along its edges, so its modules' jacks take cables while the panel is unlocked too, and a cable started there can go into any jack on the panel.
Both ends of a cable you plug by hand have to be on the same surface: two jacks on the Front Panel, or two jacks in the graph. Once plugged, the cable shows wherever both of its jacks can be seen.
Patch cables in the graph
In the graph, the jacks on the panels of the modules drawn in their nodes take cables exactly as they do on the Front Panel, and so do the jacks of Jack In and Jack Out nodes.
- Cables are drawn over the nodes and the wires, and follow the nodes when you move them.
- A click on a cable goes to what is under it, so on the empty canvas it still starts a selection box.
- Each jack node also has a Cable pin. Wiring the Cable pin of a Jack Out to the Cable pin of a Jack In in the graph is the same as plugging a cable between them. The graph does not draw a wire for it: the cable is drawn from jack to jack.
- The wiring shortcuts of the graph, such as Ctrl to drag several wires or Alt to keep a wire on its source, are for wires, not for patch cables.
Cables between modules
The two jacks of a cable do not have to be in the same module. Plug a cable from a jack inside one module to a jack inside another, or to a jack on your Front Panel, and MNodes makes the way through for you. Inside each module the cable has to leave, it adds an input or output port wired to the jack, with a name that starts with Jack In or Jack Out, and the module gets the matching pin on its node. A Rack Canvas keeps these pins off its node.
These ports stay when you pull the cable out, so plugging it back in costs nothing. Undo takes back the cable, not the port.
Cables on a Rack Canvas
On a Rack Canvas, a cable is drawn only as far as the rack shows it. Scroll a module out of view and its cables go out of view with it, and a cable coming from outside the rack meets the rack's edge. Everything about patching on a rack is in Rack Canvas.
Presets and States
Cables are part of your project, so they are saved and opened with it.
A States node and a Preset Manager preset also remember which jacks are joined. Recalling a state or a preset plugs in and pulls out cables to match. Morphing between states moves values only, never cables. A state or a preset saved before MNodes 1.1.3 has no cables in it and leaves them as they are: save it again to include them.
In Perform
Patching works in Perform on the Front Panel, on module panels and on every Rack Canvas, whatever the rack's Add, Move and Remove in Perform switches say.
- Perform has no Undo of its own. A Rack Canvas has an Undo button that takes back module and cable changes.
- Save in the menu under the MNodes logo keeps the cables as they are.
Troubleshooting
I cannot plug a cable on the Front Panel. The panel is unlocked, so a click on one of its jacks selects the widget. Lock the panel with the padlock in its toolbar. The jacks on a Rack Canvas take cables either way.
The cable does not jump into the jack. That jack will not take it: it is of another type, the two jacks are already joined, or the connection would make a feedback loop. Check the Type of both jacks first.
I cannot pick up a cable by its middle. That is on purpose: a cable is handled by its jacks, so it never gets in the way of the controls under it. Drag it from the input it is plugged into.
A cable replaced another one. An input takes one cable, so a new cable let go on a busy input replaces the one it had. Undo brings the old one back.
Right-click on a jack shows no menu. The jack has no cables plugged in.
A module got new pins after I plugged a cable. They are the ports a cable makes to leave the module. See Cables between modules.
Changing the Type of a jack pulled out its cables. A cable only joins jacks of the same type, so the cables that no longer fit are taken out.
A recalled state did not bring the cables back. It was saved before MNodes 1.1.3. Recall it, plug the cables as you want them and save the state again.